Playback starts YouTube’s embedded player (privacy-enhanced mode).
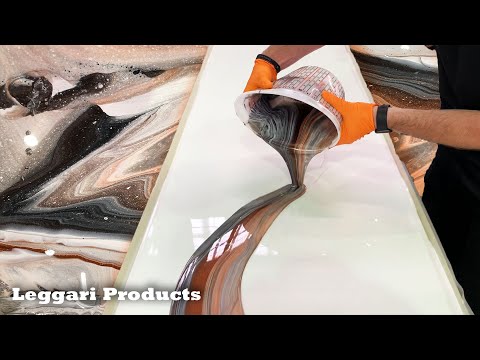
Epoxy Dirty Pour Technique On Custom Countertops Tutorial | DIY Countertop Remodel Ideas
ChannelLeggari ProductsIn brief
You’ll create a striking, custom dirty-pour epoxy finish on countertops using metallic pigments and a white base, ideal for DIYers looking to refresh existing surfaces. The process involves prepping the substrate, applying a primer, pouring metallic epoxy, and sealing with a high-wear top coat—all in under five hours. Perfect for those comfortable with basic painting techniques.
Questions & answers
What surfaces can this epoxy be applied to?
Any hard surface, including granite, marble, tile, or wood, after proper prep.
Can the top coat be matte or glossy?
Yes, the urethane top coat offers both high-gloss and matte finish options.
Description from the creator
This countertop was done using our Dirty Pour technique. This is Leggari Stone Kit #17.
The colors used were a white base. Silver, black, coffee & brass for the dirty pour.
If you're interested in purchasing this Leggari Stone (dirty pour) countertop kit, check it out leggari.com/product/leggari-stone-kit-17/?utm_s…
The process! 👇👇
THE SUBSTRATE
Prepping the surface of the countertops is easy. Most surfaces just need sanded (80-100 Grit) then wiped clean. Granite and Marble will need the sealer removed. Tile will need the grout lines filled with Bondo and sanded smooth before applying our Countertop Kits.
EPOXY PRIMER COAT
Priming the Countertops is simple and fast. Mix your pre-measured primer then dip and roll the pigmented primer across the surface until the countertop surface is completely covered. Wait 1 hr. (or until tacky and not coming off to the touch) and start applying the Base Coat.
METALLIC EPOXY COAT
There are so many different applications for our metallic epoxy coat. In this video we show you the dirty pour technique. When you place your order you'll receive step by step tutorial videos that will show you how to apply this part depending on the look you're going for!
HIGH WEAR TOP COAT
We offer 2 different Performance Engineered Top Coats. Glaze Coat is our High Build Top Coat that lays out like glass and adds depth to the Countertop. The Urethane Top Coat comes with the option to have a High Gloss or Matte finish. It needs to be rolled out super thin and leaves a minor texture on the countertop. You apply it within 24 hrs. of installing your Countertop Kit
Leggari Countertop Kits were designed to transform your countertop, tabletop, or desktop into something new and beautiful by coating your existing countertop or pre-built wood countertop. They can be installed in 3 to 5 hrs. including the prep work, and will last for decades. If you can paint your countertops, you’re more than qualified to install a Leggari Countertop Kit. Our Countertop system is leading the resin industry for thickness, durability, and scratch resistance with our High Wear Top Coats.
Our Countertop Epoxy is specifically designed for counters and can be applied to any hard surface. It’s 100% Pure Solids using the finest raw materials that include proprietary additives for working time, thickness, flow and marbleization that are vital when achieving our Dynamic Effects. Our Countertop Epoxy is also a decorative, durable and chemically resistant coating, available with a High Gloss or Matte finish.
#leggari #leggaristone #leggariproducts
The colors used were a white base. Silver, black, coffee & brass for the dirty pour.
If you're interested in purchasing this Leggari Stone (dirty pour) countertop kit, check it out leggari.com/product/leggari-stone-kit-17/?utm_s…
The process! 👇👇
THE SUBSTRATE
Prepping the surface of the countertops is easy. Most surfaces just need sanded (80-100 Grit) then wiped clean. Granite and Marble will need the sealer removed. Tile will need the grout lines filled with Bondo and sanded smooth before applying our Countertop Kits.
EPOXY PRIMER COAT
Priming the Countertops is simple and fast. Mix your pre-measured primer then dip and roll the pigmented primer across the surface until the countertop surface is completely covered. Wait 1 hr. (or until tacky and not coming off to the touch) and start applying the Base Coat.
METALLIC EPOXY COAT
There are so many different applications for our metallic epoxy coat. In this video we show you the dirty pour technique. When you place your order you'll receive step by step tutorial videos that will show you how to apply this part depending on the look you're going for!
HIGH WEAR TOP COAT
We offer 2 different Performance Engineered Top Coats. Glaze Coat is our High Build Top Coat that lays out like glass and adds depth to the Countertop. The Urethane Top Coat comes with the option to have a High Gloss or Matte finish. It needs to be rolled out super thin and leaves a minor texture on the countertop. You apply it within 24 hrs. of installing your Countertop Kit
Leggari Countertop Kits were designed to transform your countertop, tabletop, or desktop into something new and beautiful by coating your existing countertop or pre-built wood countertop. They can be installed in 3 to 5 hrs. including the prep work, and will last for decades. If you can paint your countertops, you’re more than qualified to install a Leggari Countertop Kit. Our Countertop system is leading the resin industry for thickness, durability, and scratch resistance with our High Wear Top Coats.
Our Countertop Epoxy is specifically designed for counters and can be applied to any hard surface. It’s 100% Pure Solids using the finest raw materials that include proprietary additives for working time, thickness, flow and marbleization that are vital when achieving our Dynamic Effects. Our Countertop Epoxy is also a decorative, durable and chemically resistant coating, available with a High Gloss or Matte finish.
#leggari #leggaristone #leggariproducts
About this tutorial
Leggari Products published this 16:05 video tutorial on December 25, 2019. It has been watched 4,008,076 times on YouTube.
- Channel
- Leggari Products
- Category
- Howto & Style
- Duration
- 16:05
- Published
- December 25, 2019
- Views
- 4,008,076
- Likes
- 33,121
Tags
Share
This tutorial in other languages
- FRÉpoxy sale Verser Technique sur mesure Countertops Tutorial | Bricolage Idées Countertop Remodel
- ESEpoxi sucio técnica de vertido en la costumbre Tutorial encimeras | Bricolaje ideas para mostrador Remodelar
- PTEpoxy sujo Pour Técnica no costume bancadas Tutorial | DIY bancada Ideas Remodel
- ITEpoxy sporco Pour Tecnica su Custom Countertops Tutorial | Fai da te controsoffitto Remodel Idee
- DEEpoxy Schmutzige Gießen Technik auf kundenspezifische Theken Tutorial | DIY Aufsatz- Umgestalten Ideen
- NLEpoxy Dirty Giet Techniek Op Custom Werkbladen Tutorial | DIY Countertop verbouwen Ideas
- RUЭпоксидная Грязные Налейте Техника на заказ Столешницы Учебник | DIY Прилавок реконструируют Идеи
- PLEpoxy Brudny Pour techniki na niestandardowej Blaty Tutorial | DIY blat Remodel Pomysły
- JAエポキシダーティカスタムカウンターチュートリアルでテクニックを注ぎます| DIYカウンターリフォームのアイデア
- ARالايبوكسي القذرة صب التقنية على مخصص كونترتوب دروس | DIY كونترتوب اعادة تشكيلها الأفكار
- HIEpoxy गंदा कस्टम काउंटरटॉप ट्यूटोरियल पर तकनीक डालो | DIY काउंटरटॉप फिर से तैयार विचार
- IDEpoxy Kotor Tuangkan Teknik Pada Kustom Countertops Tutorial | DIY Countertop merombak Situs