Playback starts YouTube’s embedded player (privacy-enhanced mode).
How To Camo Your Face
ChannelMilitary TimesDescription from the creator
Watch a step-by-step DIY guide of how to properly camouflage to your face for combat or hunting.
Step 1) Pick your product: camo sticks or compacts. Either works, but sticks can be waxy and may not apply as smooth -- unless you warm it up first. Compacts are easier to work with, but run out quicker.
Step 2) Apply dark greens, browns or black to the shinier parts of your face. This includes the forehead, cheekbones, nose, chin and ears. Use broad strokes. Stripes are recommended.
Step 3) Apply lighter greens and browns to the rest of your face.
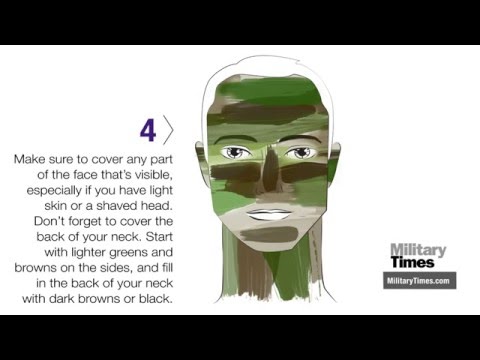
Step 4) Make sure to cover any part of the face that's visible, especially if you have light skin or a shaved head. Don't forget to cover the back of your neck. Start with lighter greens and browns on the sides, and fill in the back of your neck with dark browns or black.
Step 5) Texture is important, too. Add sawdust or dry dirt dust to help blend.
Step 6) If you don't have camo paint on hand, use natural resources such as charcoal from a fire, burned bark, vegetation or mud.
Step 7) To remove the camo paint, use makeup remover. You can find wipes in the cosmetics section. The face paint should come right off.
For more from the Military Times visit us online at:
militarytimes.com
armytimes.com/
airforcetimes.com/
marinecorpstimes.com/
navytimes.com/
On Social Media
facebook.com/MilitaryTimesOnline/
facebook.com/armytimes/
facebook.com/AirForceTimes/
facebook.com/MarineCorpsTimes/
facebook.com/navytimes/
On Twitter:
twitter.com/MilitaryTimes
@MilitaryTimes
twitter.com/ArmyTimes
@ArmyTimes
twitter.com/AirForceTimes
@AirForceTimes
twitter.com/Marinetimes
@Marinetimes
twitter.com/NavyTimes
@NavyTimes
On Instagram
instagram.com/militarytimes/
Step 1) Pick your product: camo sticks or compacts. Either works, but sticks can be waxy and may not apply as smooth -- unless you warm it up first. Compacts are easier to work with, but run out quicker.
Step 2) Apply dark greens, browns or black to the shinier parts of your face. This includes the forehead, cheekbones, nose, chin and ears. Use broad strokes. Stripes are recommended.
Step 3) Apply lighter greens and browns to the rest of your face.
Step 4) Make sure to cover any part of the face that's visible, especially if you have light skin or a shaved head. Don't forget to cover the back of your neck. Start with lighter greens and browns on the sides, and fill in the back of your neck with dark browns or black.
Step 5) Texture is important, too. Add sawdust or dry dirt dust to help blend.
Step 6) If you don't have camo paint on hand, use natural resources such as charcoal from a fire, burned bark, vegetation or mud.
Step 7) To remove the camo paint, use makeup remover. You can find wipes in the cosmetics section. The face paint should come right off.
For more from the Military Times visit us online at:
militarytimes.com
armytimes.com/
airforcetimes.com/
marinecorpstimes.com/
navytimes.com/
On Social Media
facebook.com/MilitaryTimesOnline/
facebook.com/armytimes/
facebook.com/AirForceTimes/
facebook.com/MarineCorpsTimes/
facebook.com/navytimes/
On Twitter:
twitter.com/MilitaryTimes
@MilitaryTimes
twitter.com/ArmyTimes
@ArmyTimes
twitter.com/AirForceTimes
@AirForceTimes
twitter.com/Marinetimes
@Marinetimes
twitter.com/NavyTimes
@NavyTimes
On Instagram
instagram.com/militarytimes/
About this tutorial
Military Times published this 0:40 video tutorial on November 1, 2016. It has been watched 101,898 times on YouTube.
- Channel
- Military Times
- Category
- Howto & Style
- Duration
- 0:40
- Published
- November 1, 2016
- Views
- 101,898
- Likes
- 1,108