Playback starts YouTube’s embedded player (privacy-enhanced mode).
How to knot and make a pearl necklace - easy tutorial
ChannelAngablue®Description from the creator
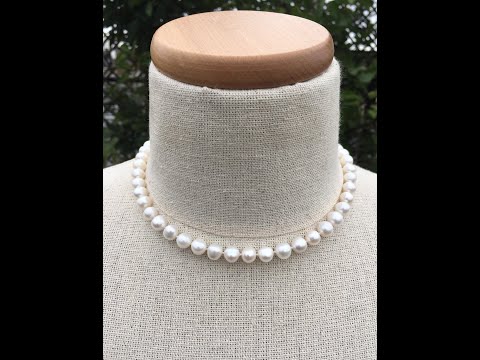
This video tutorial will teach you how to make a classic style pearl necklace, by tying a knot in between beads. This method is very easy and ideal for beginners. For more images of this necklace, length/pearl width conversion chart, and other tips, please visit our website: www.angablue.com
I apologize as there are some mistakes on my video which are stated (and corrected) below:
Materials and tools you will need:
1) Real or faux pearls or any other beads. You can use any bead or pearl size as long as the inner hole is 0.8mm. In this project, I used a strand of 7-8mm freshwater pearls with 0.8mm hole drilled through (this inner hole will determine the size of the silk thread).
2) 1.5m of Griffin silk cord size S6F (approx. diameter 0.35mm). This thread width is ideal for 0.8mm inner hole pearls. "The recording states 2m, but 1.5m is more than enough."
3) Two 10mm cuts of gold french wire (width: medium 0.9mm)
4) Gold clasp. I used ClaspGarten 23 carat gold box clasp with faux pearl detail.
5) G-S Hypo Cement Glue with needle tip
6) Scissors
7) Wirecutter (for the french wire, although scissors can be used)
8) Measuring tape
9) Beadalon collapsible eye needle medium (0.36mm x 6.4cm)
Instructions:
Thread the eye needle. String most of the pearls - leave 6 of them aside (they will be used at the end). Thread one of the french wire cuts, pull it through and place it about 40cm from the thread edge (side with the needle). Thread the clasp ring and bring the thread back through the first pearl. Bend the wire, forming a loop. Tighten the first bead so that there is no gap in between the french wire loop and the first pearl. Tie a double knot in between the first and the second pearls, then, pull the thread through the second pearl and repeat this step to all strung pearls, except the last one. On the last strung pearl, add glue before tightening the knot and trim the thread (this thread should be the one with the needle, which should also be the shorter tail). Later, swap the needle to the remaining tail, string the left 6 pearls, and the final french wire cut. Thread the clasp ring and bring the thread back through the last bead. Try not to leave an excessive space in between the 6 remaining pearls, just enough for the knots. Before finishing tying each double knot, add a small amount of cement glue to it. This will secure the knot. Pull the thread through the next pearl. Repeat this step to the remaining 5 pearls. Finally, trim the thread tail.
I apologize as there are some mistakes on my video which are stated (and corrected) below:
Materials and tools you will need:
1) Real or faux pearls or any other beads. You can use any bead or pearl size as long as the inner hole is 0.8mm. In this project, I used a strand of 7-8mm freshwater pearls with 0.8mm hole drilled through (this inner hole will determine the size of the silk thread).
2) 1.5m of Griffin silk cord size S6F (approx. diameter 0.35mm). This thread width is ideal for 0.8mm inner hole pearls. "The recording states 2m, but 1.5m is more than enough."
3) Two 10mm cuts of gold french wire (width: medium 0.9mm)
4) Gold clasp. I used ClaspGarten 23 carat gold box clasp with faux pearl detail.
5) G-S Hypo Cement Glue with needle tip
6) Scissors
7) Wirecutter (for the french wire, although scissors can be used)
8) Measuring tape
9) Beadalon collapsible eye needle medium (0.36mm x 6.4cm)
Instructions:
Thread the eye needle. String most of the pearls - leave 6 of them aside (they will be used at the end). Thread one of the french wire cuts, pull it through and place it about 40cm from the thread edge (side with the needle). Thread the clasp ring and bring the thread back through the first pearl. Bend the wire, forming a loop. Tighten the first bead so that there is no gap in between the french wire loop and the first pearl. Tie a double knot in between the first and the second pearls, then, pull the thread through the second pearl and repeat this step to all strung pearls, except the last one. On the last strung pearl, add glue before tightening the knot and trim the thread (this thread should be the one with the needle, which should also be the shorter tail). Later, swap the needle to the remaining tail, string the left 6 pearls, and the final french wire cut. Thread the clasp ring and bring the thread back through the last bead. Try not to leave an excessive space in between the 6 remaining pearls, just enough for the knots. Before finishing tying each double knot, add a small amount of cement glue to it. This will secure the knot. Pull the thread through the next pearl. Repeat this step to the remaining 5 pearls. Finally, trim the thread tail.
About this tutorial
Angablue® published this 11:15 video tutorial on June 25, 2020. It has been watched 158,233 times on YouTube.
- Channel
- Angablue®
- Category
- Howto & Style
- Duration
- 11:15
- Published
- June 25, 2020
- Views
- 158,233
- Likes
- 2,906
Tags
Share
This tutorial in other languages
- FRComment nouer et faire un collier de perles - tutoriel facile
- ESCómo hacer un nudo y un collar de perlas - fácil tutorial
- PTComo nó e fazer um colar de pérolas - fácil tutorial
- ITCome nodo e fare una collana di perle - semplice tutorial
- DEWie verknoten und eine Perlenkette zu machen - einfaches Tutorial
- NLHoe te knopen en maken een parelsnoer - eenvoudig leerprogramma
- RUКак завязывать и сделать жемчужное ожерелье - легкий учебник
- PLJak knot i zrobić naszyjnik - prosty samouczek
- JA結び目と真珠のネックレスの作り方 - 簡単なチュートリアル
- ARكيفية عقدة وجعل عقد من اللؤلؤ - من السهل تعليمي
- HIगाँठ और एक मोती का हार बनाने के लिए - आसान ट्यूटोरियल
- IDBagaimana simpul dan membuat kalung mutiara - mudah tutorial