Playback starts YouTube’s embedded player (privacy-enhanced mode).
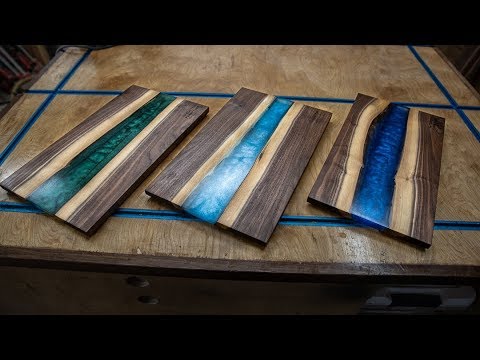
How to Make Epoxy Cutting Boards
ChannelYouCanMakeThisTooIn brief
Transform rough live-edge wood into stylish epoxy resin boards perfect for serving, charcuterie, or light food prep. You’ll mill and split the wood, build a sealed mold, mix and pour epoxy with pigments, then sand and finish with mineral oil for a smooth, durable surface. Ideal for woodworkers or DIYers who enjoy hands-on projects with a polished result.
Key steps
- Mill and plane rough wood to create flat, even surfaces for cutting.
- Remove bark, cut boards to size, and split them into two halves.
- Build a sealed plywood mold with tuck tape to contain the epoxy.
- Mix epoxy with pigments, pour carefully, and monitor for leaks.
- Wet-sand with micro mesh pads to restore epoxy clarity.
- Soak boards in mineral oil for a day, then wipe off excess.
Questions & answers
Can I use any wood for this project?
Yes, while the video uses air-dried walnut, any wood can work as long as it’s properly prepared and sealed.
How much epoxy will I need?
The creator used 64 ounces total for three boards, but the exact amount depends on board thickness and size.
Description from the creator
These are for sale, see below for the link if you want to buy these or my other cutting boards and for the discount code for TotalBoat epoxy!
Are these safe to cut on? I wouldn’t, the epoxy will flake. They’re best for serving. Why do I call them cutting boards? That’s what I grew up calling any cutting, serving, or charcuterie board or tray - and I doubt I’m the only one. Exercise your own good judgment about how you prepare what you put in your body.
To join the Patreon contest for the Ridgid Octane Jigsaw, head over to Patreon.com/youcanmakethistoo for more information! Contents and prizes change monthly.
ARTICLE
ycmt2.com/epoxy-cutting-boards/
Cutting Boards for Sale!
ycmt2.com/cuttingboards
DISCOUNT CODE:
Epoxy: totalboat.com/product/totalboat-thickset-castin… visit ycmt2.com/discounts for discount code
MATERIALS USED IN THIS PROJECT:
Epoxy: amzn.to/2mSB96y
Pigments: amzn.to/2mVUTpI
Tuck Tape: amzn.to/2nz4UK1
Micromesh Pads: amzn.to/2nqwysj
Mineral Oil: amzn.to/2m1F8xs
TOOLS I USE
ycmt2.com/tools-I-use
MY LINKS
Website: ycmt2.com
Patreon: patreon.com/user?u=4990417
Facebook: facebook.com/YouCanMakeThisToo/
Instagram: instagram.com/youcanmakethistoo/
Twitter: twitter.com/YouCanMakeThis2 @YouCanMakeThis2
___
Music from Epidemicsound.com
1. Prepare the wood
My boards were pretty rough, so I had to mill them first. I used a planer sled to get a flat face and then planed the opposite side.
After they were planed, I removed the bark, cut the boards to length, and split them down the middle. This created the two sides for each cutting board.
2. Build a mold
I used 1/2” plywood for my mold. To make sure the epoxy won’t stick to it, I wrapped the whole thing in tuck tape. Taking care to seal the corners. If there’s anywhere for the epoxy to get out, it will!
The mold was basically a bottom piece, and then side pieces screwed to the bottom piece and each other to create chambers around the boards.
3. Mix and pour epoxy
I knew I would use a lot of epoxy to do three boards, but not how much. In total I ended up mixing 64 ounces for these three boards. I started with 32 ounces, which I knew wouldn’t be enough. After the first board, I had a good idea how much epoxy I would use.
Along the way I experimented with different epoxy pigments. Changing how much pigment, mixing pigments, etc… there’s a lot of creativity to be had here!
The most important thing is to watch for leaks, and be sure to follow the epoxy mixing instructions! If the ratio is off, or if it’s not mixed well enough.. it won’t cure properly!
4. Sand and finish the boards
After the epoxy had plenty of time to cure, I removed the boards from the mold and started flattening them. I used my drum sander, but a hand sander would be fine.
It’s important to go slow, sanding builds heat which can turn the epoxy into a gummy mess and clog the paper. In hindsight, it would have been better to leave the boards and bit thick and underfill the epoxy slightly, then sand the wood to meet the epoxy - instead of sanding the epoxy down to the board.
To get the clarity back to the epoxy I used a micro mesh pad kit and wet sanded through all the grits.
Finally, the boards got a mineral oil bath! They were allowed to soak for a day, and then I wiped off the excess.
#woodworking #cuttingboards #epoxy
About this tutorial
YouCanMakeThisToo published this 16:23 video tutorial on October 29, 2019. It has been watched 3,036,699 times on YouTube.
- Channel
- YouCanMakeThisToo
- Category
- Howto & Style
- Duration
- 16:23
- Published
- October 29, 2019
- Views
- 3,036,699
- Likes
- 42,079
Tags
Share
This tutorial in other languages
- FRComment faire Planches à découper époxy
- ESCómo hacer tablas de cortar epoxi
- PTComo fazer Tábuas de corte de epóxi
- ITCome fare Taglieri epossidiche
- DEWie man Cutting Boards Epoxy
- NLHoe maak Epoxy Cutting Boards
- RUКак сделать Эпоксидные разделочные доски
- PLJak zrobić epoksydowe deski do krojenia
- JAエポキシまな板を作る方法
- ARكيفية جعل المجالس قطع الايبوكسي
- HIकैसे Epoxy कटिंग बोर्ड बनाने के लिए
- IDCara Membuat Epoxy Cutting Boards