Playback starts YouTube’s embedded player (privacy-enhanced mode).
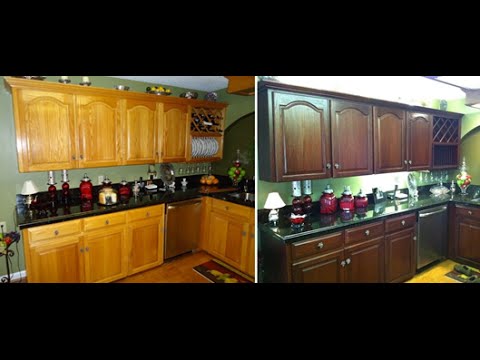
How To Do It Yourself Kitchen Cabinet Color Change No Stripping and Cheap Refinishing!
ChannelAn Average ChannelDescription from the creator
Products Used:
1. Simple Green Degreaser for cabinets ** I used Simple Green here and dilluted it with warm water. You can use any cabinet degreaser you prefer but try to stick with a mild degreaser. Dawn with water would work fine for the initial cleaning.
2. 3M Scuff Pads ** I used the maroon 7447 pads here for heavy cleaning and surface abrasion.
3. Water Based Stain+ Polyurethane One Step ** Several companies make this premixed such as Min-Wax and Rust Oleum and they all work pretty well. I prefer to make my own by mixing General Finishes water based polyurethane finish with Trans Tint Dye which can all be purchased on amazon and it gives you mixing instructions.
4. Additional suggestions: After you let your first coat dry to the touch - I use the 3M gray pads to lightly scuff in between each coat. This allows for a smoother final surface and proper abrasion for each coat to grab on to the previous layer.
5. Optional but suggested: For your final top coat use a non tinted polyurethane. For darker coats I will often apply anywhere from 3-6 layers of colored finish then I add 1-2 final clear coats. This method can be used by hand like in the video or with a sprayer (if using a sprayer you must apply this in very light coats)
About this tutorial
An Average Channel published this 2:40 video tutorial on November 11, 2015. It has been watched 402,416 times on YouTube.
- Channel
- An Average Channel
- Category
- Music
- Duration
- 2:40
- Published
- November 11, 2015
- Views
- 402,416
- Likes
- 652
Tags
Share
This tutorial in other languages
- FRComment faire vous-même d'armoires de cuisine Changement de couleur Pas Décapage et finition bon marché!
- ESCómo lo hace usted mismo gabinete de cocina de cambio de color No se pela y Repintado barato!
- PTComo Do It Yourself Kitchen Cabinet Color Change No descascamento e retoque barato!
- ITCome To Do It Yourself Kitchen Cabinet Cambia colore No a nudo e poco costoso Refinishing!
- DEWie es sich Küche-Kabinett-Farbe ändern Kein Stripping und günstige Nacharbeiten zu tun!
- NLHow To Do It Yourself keukenkast Kleurwissel Geen Strippen en goedkoop Refinishing!
- RUКак сделать это самостоятельно кухонный шкаф Изменение цвета Нет раздевание и дешевые лакокрасочный!
- PLJak to zrobić Yourself Kitchen Cabinet zmiana koloru Nie odizolowania i tania Renowacja!
- JAそれを自分で行う方法をキッチンキャビネット色の変更はありませんストリップと安い補修!
- ARكيف تفعل ذلك بنفسك مطبخ مجلس الوزراء تغير لون لا تجريد وطلاء رخيصة!
- HIकैसे यह स्वयं करें करने के लिए रसोई मंत्रिमंडल रंग बदलें कोई स्ट्रिपिंग और सस्ते रिफिनिशिंग!
- IDCara Do It Yourself Kabinet Dapur Ubah Warna ada Stripping dan murah Refinishing!