Playback starts YouTube’s embedded player (privacy-enhanced mode).
How to paint a DIY geometric feature wall in four easy steps
ChannelCat HaseIn brief
Transform a plain wall into a striking geometric feature with a bold, custom pattern. This quick tutorial shows how to plan, tape, paint, and reveal your design—ideal for adding personality to any room with minimal effort. Perfect for DIYers who enjoy hands-on projects and want a fresh, artistic look without complex tools.
Description from the creator
Create your very own geometric feature wall for your next DIY project. Tape out your own pattern, paint the gaps and then do the big reveal!
This timelaspe video shows the making of my own painted feature wall with colours chosen to match furnishings already in the room. You can use whatever colour inspiration you want.
See how to do it yourself by watching the whole video or skipping to these four steps:
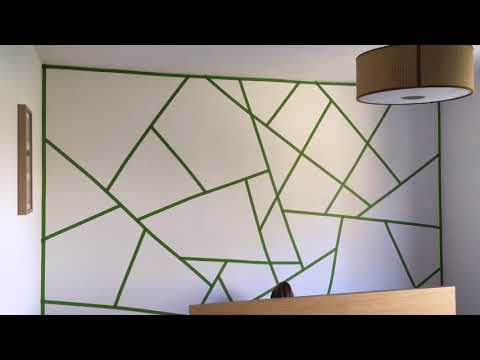
00:00 Mark out your pattern - You can create whatever size and shape you want in this step. Use frog tape (or similar) to mark out your pattern on the wall. Add more strips until you are happy with how it looks.
00:13 Decide which sections will be which colour - I wanted to make sure they were spread out and no two next to each other were the same so I used post-it notes to represent each colour so I could see it all before I started painting. If you have less colours this might not be possible. Get creative or paint on the fly and see what you end up with!
00:23 Get painting – I applied two layers of each colour to get good coverage. I was painting over white walls so had a good blank canvas to use, but white likes to show through until it has plenty of colour over it!
02:52 The reveal – My favourite bit!! Once everything is painted it’s time to peel off the tape. You’ll need to find the strips that go over the top and peel it off in sections. Occasionally you’ll find bits of paint have bled or come off with the tape. Patch them up as you go.
03:07 Smile at the amazing wall you’ve created!
What you’ll need for this project;
- Frog tape (or similar masking tape)
- Paint in a variety of colours (you could use just one colour to create a pattern or you could use as many as you want!) I got small pots or samples of some of the colours because you don’t need a whole walls worth of each one.
- Paint brush/rollers & paint trays
- Post-it notes (or similar) to mark out your colours if you want to plan it in advance
- Step ladder if you can’t reach the whole wall!
Go get creative on your own walls!
#DIY #FeatureWall #GeometricWall #AbstractWall #AccentWall
This timelaspe video shows the making of my own painted feature wall with colours chosen to match furnishings already in the room. You can use whatever colour inspiration you want.
See how to do it yourself by watching the whole video or skipping to these four steps:
00:00 Mark out your pattern - You can create whatever size and shape you want in this step. Use frog tape (or similar) to mark out your pattern on the wall. Add more strips until you are happy with how it looks.
00:13 Decide which sections will be which colour - I wanted to make sure they were spread out and no two next to each other were the same so I used post-it notes to represent each colour so I could see it all before I started painting. If you have less colours this might not be possible. Get creative or paint on the fly and see what you end up with!
00:23 Get painting – I applied two layers of each colour to get good coverage. I was painting over white walls so had a good blank canvas to use, but white likes to show through until it has plenty of colour over it!
02:52 The reveal – My favourite bit!! Once everything is painted it’s time to peel off the tape. You’ll need to find the strips that go over the top and peel it off in sections. Occasionally you’ll find bits of paint have bled or come off with the tape. Patch them up as you go.
03:07 Smile at the amazing wall you’ve created!
What you’ll need for this project;
- Frog tape (or similar masking tape)
- Paint in a variety of colours (you could use just one colour to create a pattern or you could use as many as you want!) I got small pots or samples of some of the colours because you don’t need a whole walls worth of each one.
- Paint brush/rollers & paint trays
- Post-it notes (or similar) to mark out your colours if you want to plan it in advance
- Step ladder if you can’t reach the whole wall!
Go get creative on your own walls!
#DIY #FeatureWall #GeometricWall #AbstractWall #AccentWall
About this tutorial
Cat Hase published this 3:08 video tutorial on October 30, 2018. It has been watched 7,322,248 times on YouTube.
- Channel
- Cat Hase
- Category
- People & Blogs
- Duration
- 3:08
- Published
- October 30, 2018
- Views
- 7,322,248
- Likes
- 44,767
Share
This tutorial in other languages
- FRComment peindre un mur de caractéristique géométrique de bricolage en quatre étapes faciles
- ESCómo pintar una pared de la característica geométrica de bricolaje en cuatro sencillos pasos
- PTComo pintar uma parede característica geométrica DIY em quatro etapas fáceis
- ITCome dipingere una parete della caratteristica geometrica fai da te in quattro semplici passaggi
- DEWie eine DIY geometrisches Merkmal Wand in vier einfachen Schritten malen
- NLHoe maak je een DIY geometrische eigenschap muurverf in vier eenvoudige stappen
- RUКак нарисовать DIY геометрическую стену особенность в четыре простых шага
- PLJak malować DIY geometryczne funkcji ściany w czterech prostych krokach
- JA4つのステップで簡単にDIYの幾何学的特徴の壁をペイントする方法
- ARكيف ترسم DIY جدار ميزة الهندسي في أربع خطوات سهلة
- HIचार आसान चरणों में एक DIY ज्यामितीय सुविधा दीवार पेंट करने के लिए कैसे
- IDCara melukis dinding fitur geometris DIY dalam empat langkah mudah