Playback starts YouTube’s embedded player (privacy-enhanced mode).
Tutorial: Tips on how to remove or delete hidden network adapter on windows 10
ChannelMCetl infoDescription from the creator
HOW TO REMOVE HIDDEN NETWORK ADAPTER WINDOWS 10 : Usually Microsoft windows hide devices, which are not currently connected to the system, but they still exist in windows configuration. This might cause the problem when you need to locate and rename a network device in windows operating system and you will get the error “the connection already exist”, this is caused when the old adapters fails to remove IP configuration from the devices.
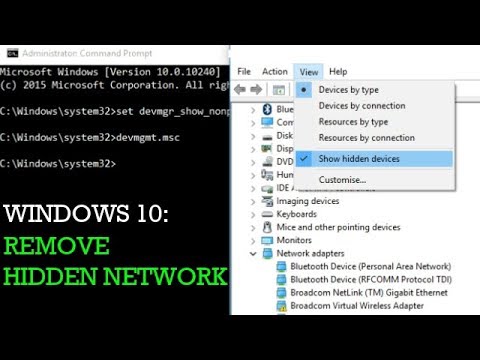
To resolve the issues, you will need to run command prompt with administrator right. Press Win + X to open the command prompt (Admin). Click yes on the prompted window to verify user account privileges.
In the command prompt type in “SET DEVMGR_SHOW_NONPRESENT_DEVICES=1” then press enter to allow the command to execute.
Types in again “START DEVMGMT.MSC” then press enter:
This command will open the special device manager window, on the menu click View; the list of options will be given to you, select Show Hidden Devices. Then expand the network adapter scroll down tray, you will see several hidden network adapter on your PC.
The unwanted device will appear dimmed, right click on dimmed network then click uninstall to remove it from your PC. Then now you can go back to network center and rename adapter to what you want.
To resolve the issues, you will need to run command prompt with administrator right. Press Win + X to open the command prompt (Admin). Click yes on the prompted window to verify user account privileges.
In the command prompt type in “SET DEVMGR_SHOW_NONPRESENT_DEVICES=1” then press enter to allow the command to execute.
Types in again “START DEVMGMT.MSC” then press enter:
This command will open the special device manager window, on the menu click View; the list of options will be given to you, select Show Hidden Devices. Then expand the network adapter scroll down tray, you will see several hidden network adapter on your PC.
The unwanted device will appear dimmed, right click on dimmed network then click uninstall to remove it from your PC. Then now you can go back to network center and rename adapter to what you want.
About this tutorial
MCetl info published this 2:02 video tutorial on November 5, 2018. It has been watched 25,025 times on YouTube.
- Channel
- MCetl info
- Category
- People & Blogs
- Duration
- 2:02
- Published
- November 5, 2018
- Views
- 25,025
- Likes
- 75
Share
This tutorial in other languages
- FRTutoriel: Conseils sur la façon de supprimer ou supprimer la carte réseau caché sur Windows 10
- ESTutorial: consejos sobre cómo eliminar o borrar adaptador de red oculta en las ventanas 10
- PTTutorial: Dicas sobre como remover ou excluir adaptador de rede oculta no Windows 10
- ITTutorial: Suggerimenti su come rimuovere o cancellare scheda di rete nascosta su Windows 10
- DETutorial: Tipps, wie Sie versteckten Netzwerkadapter auf 10 Fenster entfernen oder löschen
- NLTutorial: Tips over hoe je verborgen netwerk adapter op Windows 10 verwijderen of te wissen
- RUУчебник: Советы о том, как удалить или удалить скрытый сетевой адаптер на окнах 10
- PLTutorial: Wskazówki na temat usuwania lub usunąć ukrytą kartę sieciową w systemie Windows 10
- JAチュートリアル:窓10に隠されたネットワークアダプタを削除するか、削除する方法についてのヒント
- ARالبرنامج التعليمي: نصائح حول كيفية إزالة أو حذف محول الشبكة مخفية على ويندوز 10
- HIट्यूटोरियल: खिड़कियों 10 पर निकालना या हटाना कैसे छिपा नेटवर्क एडाप्टर पर युक्तियाँ
- IDTutorial: Tips tentang cara untuk menghapus atau menghapus adaptor jaringan tersembunyi di jendela 10