Playback starts YouTube’s embedded player (privacy-enhanced mode).
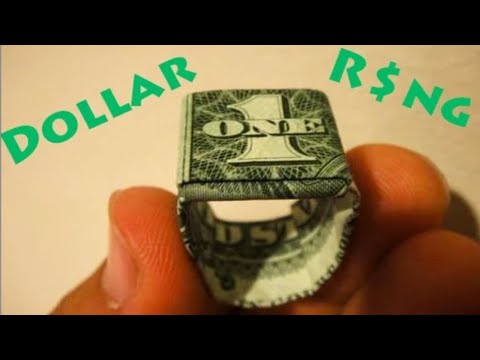
How to Make an Origami Dollar Ring (Moneygami) - Rob's World
ChannelRob's WorldIn brief
You’ll fold a dollar bill into a stylish ring—no cutting or damage—using Rob’s clear, beginner-friendly instructions. The same method works with printer paper (15.5 cm × 6 cm) if you don’t have a bill, though measurements are approximate. Perfect for quick gifts or creative projects.
Questions & answers
Will this work with bills other than a dollar?
Yes, but larger bills ($10, $20, etc.) may have numbers cut off at the top.
What if my paper isn’t exactly 15.5 cm × 6 cm?
The measurements are a guide—experiment to fit your paper size.
Can I unfold the dollar later?
Yes, the folds don’t damage the bill, so it can be straightened out.
Description from the creator
Like this Video? Check out my Fun Creations Playlist HERE:
youtube.com/watch?v=Qi3xwubUr1E&list=PL4233…
***PLEASE NOTE: Making this model does NOT ruin or destroy the dollar in any way! It is simply being folded, there are NO tears or cuts being made in the dollar. You can always unfold it and straighten it out, or better yet give it to someone in ring form as a gift :-)
In this video I explain in extreme detail for beginners how to make an Origami ring from a dollar bill and give a quick way you can make it from paper.
I do recommend that you use a simple $1 bill because I think it fits the nicest. However, any other American bills will work, yet larger bill numbers for $10, $20, $50, or $100 usually get cut off from the top portion of the ring.
I am aware that I have viewers from other countries who may not have American bills handy, so I quickly explain a way you can make this using regular printer paper. I give the dimensions:
Length: 15.5 cm
Width: 6 cm
Also, HERE are the measurements for where you should make the folds on a piece of PAPER. ALL measurements are from the very LEFT side of the paper and indicate where to fold as instructed in the video. NOTE THAT THESE MEASUREMENTS MAY NOT FIT YOU OR WORK PERFECTLY** Please experiment with your paper, this is only to get a general idea.
First fold (left "border" of 1) - 0.25" or about 7mm
Second fold (right "border" of 1) - about 1" or 2.5 cm
Third (between O and F) - 3.75" or 9.5 cm - remember this is where the BOTTOM edge of the paper should be as demonstrated in the video*
Thanks for watching and be sure to comment, rate, and subscribe to my videos! :-)
-Rob
Main Channel:
YouTube.com/c/RobsWorld
Instagram:
Instagram.com/TheRobWorld
Shirts:
districtlines.com/Robs-World
Facebook:
facebook.com/TheRobWorld
Twitter:
twitter.com/TheRobWorld
Origami Dollar Bill Ring Rob's World Easy Simple Tutorial
#RobsWorld #FunCreations #Moneygami
youtube.com/watch?v=Qi3xwubUr1E&list=PL4233…
***PLEASE NOTE: Making this model does NOT ruin or destroy the dollar in any way! It is simply being folded, there are NO tears or cuts being made in the dollar. You can always unfold it and straighten it out, or better yet give it to someone in ring form as a gift :-)
In this video I explain in extreme detail for beginners how to make an Origami ring from a dollar bill and give a quick way you can make it from paper.
I do recommend that you use a simple $1 bill because I think it fits the nicest. However, any other American bills will work, yet larger bill numbers for $10, $20, $50, or $100 usually get cut off from the top portion of the ring.
I am aware that I have viewers from other countries who may not have American bills handy, so I quickly explain a way you can make this using regular printer paper. I give the dimensions:
Length: 15.5 cm
Width: 6 cm
Also, HERE are the measurements for where you should make the folds on a piece of PAPER. ALL measurements are from the very LEFT side of the paper and indicate where to fold as instructed in the video. NOTE THAT THESE MEASUREMENTS MAY NOT FIT YOU OR WORK PERFECTLY** Please experiment with your paper, this is only to get a general idea.
First fold (left "border" of 1) - 0.25" or about 7mm
Second fold (right "border" of 1) - about 1" or 2.5 cm
Third (between O and F) - 3.75" or 9.5 cm - remember this is where the BOTTOM edge of the paper should be as demonstrated in the video*
Thanks for watching and be sure to comment, rate, and subscribe to my videos! :-)
-Rob
Main Channel:
YouTube.com/c/RobsWorld
Instagram:
Instagram.com/TheRobWorld
Shirts:
districtlines.com/Robs-World
Facebook:
facebook.com/TheRobWorld
Twitter:
twitter.com/TheRobWorld
Origami Dollar Bill Ring Rob's World Easy Simple Tutorial
#RobsWorld #FunCreations #Moneygami
About this tutorial
Rob's World published this 11:12 video tutorial on November 3, 2010. It has been watched 5,497,641 times on YouTube.
- Channel
- Rob's World
- Category
- Education
- Duration
- 11:12
- Published
- November 3, 2010
- Views
- 5,497,641
- Likes
- 43,752
Share
This tutorial in other languages
- FRComment faire un anneau Dollar Origami (Moneygami) - Le monde de Rob
- ESCómo hacer un anillo Dólar Origami (Moneygami) - Mundial de Rob
- PTComo fazer um dólar Anel Origami (Moneygami) - Mundial de Rob
- ITCome fare un dollaro anello di Origami (Moneygami) - di Rob mondo
- DEWie ein Origami Dollar Ring (Moneygami) Make - Robs Welt
- NLHoe maak je een Origami Dollar Ring (Moneygami) - Rob's Wereld
- RUКак сделать доллар кольцо Origami (Moneygami) - Мир Роба
- PLJak zrobić Origami Dolar Ring (Moneygami) - Roba Świat
- JAロブの世界 - 折り紙ドルリング(Moneygami)を作成する方法
- ARكيفية تقديم حلقة الدولار اوريغامي (Moneygami) - العالمية روب
- HIकैसे बनाने के लिए एक Origami डॉलर की अंगूठी (Moneygami) - रोब वर्ल्ड
- IDCara Membuat Origami Dollar Cincin (Moneygami) - Rob Dunia