Playback starts YouTube’s embedded player (privacy-enhanced mode).
How to Make a Fire Pit Seating Area: Backyard Makeover - Thrift Diving
ChannelThrift DivingIn brief
Transform a backyard into a cozy fire pit seating area with a stone walkway and gravel base. Thrift Diving shows how to shape the space, prepare the ground, and add seating—ideal for anyone wanting a functional outdoor gathering spot.
Key steps
- Mark the fire pit seating area’s circle or shape with string trimmer.
- Break up and dig the earth within the outlined perimeter.
- Lay weed block fabric and secure it with pins.
- Add cardboard (optional) for extra weed suppression.
- Line the seating area edges with pavestone edgers.
- Arrange folding chairs and a patio rug for seating.
Questions & answers
Do I need sand for the edgers?
No—Thrift Diving used clay soil and weed block fabric, and the edgers stayed in place without sand.
How much pea gravel is needed?
Thrift Diving used about 25 bags, but notes more could be added for deeper coverage.
Chapters
Description from the creator
I created a DIY fire pit for my backyard one summer, but it needed seating and a walkway, which I created in this video. A fire pit is a warm, cozy, and safe place to see family and friends outdoors, especially during these times. Watch and see how to use a fire pit kit with stones to create a fire pit with a stone walkway and seating.
For the complete materials list, visit the blog post: thriftdiving.com/build-diy-fire-pit/?utm_campai…
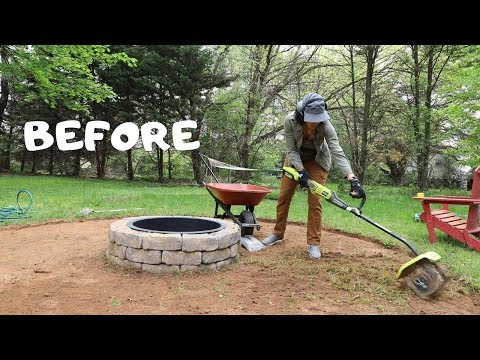
0:00 - Intro and "BEFORE" pics
0:33 - Creating the circle/shape of the fire pit seating area.
1:03 - Use a string trimmer to outline the fire pit seating area shape.
1:29 - Use a cultivator to break up the earth. (I'm using the RYOBI cultivator which you can find here: homedepot.sjv.io/QqNNa
1:39 - Edgers used: Pavestone from Home Depot: homedepot.sjv.io/AYKXx
2:08 - Tools used and digging the perimeter of fire pit.
3:21 - Clearing out fire pit seating area.
3:56 - Adding weed block fabric. (NOTE: I didn't use sand because I have clay soil and didn't feel I needed the added support to keep the edgers in place. The edgers have NOT shifted over time).
4:58 - Adding cardboard. (NOTE: You do NOT have to use cardboard. I used it for extra weed block, but mostly just wanted to recycle it).
5:49 - Lining edges along the seating area. (NOTE: Use weed block pins to keep it in place).
6:20 - Adding pea gravel (NOTE: I added about 25 bags, but could have used more).
7:18 - Using up extra edgers.
7:32 - Using extra edges for planters.
8:02 - Laying indoor/outdoor patio rug.
8:10 - Seating up folding chairs. Find them here (affiliate link): amzn.to/388COdq
//PRODUCTS//
Pavestone Rumblestone Edgers (gray) -Affiliate link:
homedepot.sjv.io/AYKXx
Pavestone Rumblestone Bench Kit: homedepot.sjv.io/aZKQb
//PROJECT GALLERY//
Check out my Project Gallery:
thriftdiving.com/projects?utm_campaign=Social-M…
Subscribe to my mailing list for 5 additional freebies:
thriftdiving.com/subscribe?utm_campaign=Social-…
***************
BLOG: thriftdiving.com
EMAIL: [email protected]
FACEBOOK: facebook.com/thriftdiving
PINTEREST: pinterest.com/thriftdiving
INSTAGRAM: instagram.com/thriftdiving
TWITTER: twitter.com/thriftdiving
SNAPCHAT: snapchat.com/add/thriftdiving
THRIFT DIVING TEE-SHIRTS: thriftdiving.com/shop
***************
MAILING ADDRESS:
Serena Appiah
P.O. Box 463
Spencerville, MD 20858
For the complete materials list, visit the blog post: thriftdiving.com/build-diy-fire-pit/?utm_campai…
0:00 - Intro and "BEFORE" pics
0:33 - Creating the circle/shape of the fire pit seating area.
1:03 - Use a string trimmer to outline the fire pit seating area shape.
1:29 - Use a cultivator to break up the earth. (I'm using the RYOBI cultivator which you can find here: homedepot.sjv.io/QqNNa
1:39 - Edgers used: Pavestone from Home Depot: homedepot.sjv.io/AYKXx
2:08 - Tools used and digging the perimeter of fire pit.
3:21 - Clearing out fire pit seating area.
3:56 - Adding weed block fabric. (NOTE: I didn't use sand because I have clay soil and didn't feel I needed the added support to keep the edgers in place. The edgers have NOT shifted over time).
4:58 - Adding cardboard. (NOTE: You do NOT have to use cardboard. I used it for extra weed block, but mostly just wanted to recycle it).
5:49 - Lining edges along the seating area. (NOTE: Use weed block pins to keep it in place).
6:20 - Adding pea gravel (NOTE: I added about 25 bags, but could have used more).
7:18 - Using up extra edgers.
7:32 - Using extra edges for planters.
8:02 - Laying indoor/outdoor patio rug.
8:10 - Seating up folding chairs. Find them here (affiliate link): amzn.to/388COdq
//PRODUCTS//
Pavestone Rumblestone Edgers (gray) -Affiliate link:
homedepot.sjv.io/AYKXx
Pavestone Rumblestone Bench Kit: homedepot.sjv.io/aZKQb
//PROJECT GALLERY//
Check out my Project Gallery:
thriftdiving.com/projects?utm_campaign=Social-M…
Subscribe to my mailing list for 5 additional freebies:
thriftdiving.com/subscribe?utm_campaign=Social-…
***************
BLOG: thriftdiving.com
EMAIL: [email protected]
FACEBOOK: facebook.com/thriftdiving
PINTEREST: pinterest.com/thriftdiving
INSTAGRAM: instagram.com/thriftdiving
TWITTER: twitter.com/thriftdiving
SNAPCHAT: snapchat.com/add/thriftdiving
THRIFT DIVING TEE-SHIRTS: thriftdiving.com/shop
***************
MAILING ADDRESS:
Serena Appiah
P.O. Box 463
Spencerville, MD 20858
About this tutorial
Thrift Diving published this 9:16 video tutorial on November 1, 2019. It has been watched 3,591,661 times on YouTube.
- Channel
- Thrift Diving
- Category
- Howto & Style
- Duration
- 9:16
- Published
- November 1, 2019
- Views
- 3,591,661
- Likes
- 63,853
Tags
Share
This tutorial in other languages
- FRComment faire un coin salon Fire Pit: Cour arrière Makeover - Plongée Thrift
- ESCómo hacer un pozo de fuego Zona de estar: Patio trasero cambio de imagen - Ahorro de buceo
- PTComo fazer um Fire Pit Área de Estar: Backyard Makeover - Thrift Mergulho
- ITCome fare un pozzo del fuoco Zona soggiorno: Backyard Makeover - Thrift Diving
- DEWie man eine Feuerstelle Sitzecke: Hinterhof Makeover - Thrift Tauchen
- NLHoe maak je een Fire Pit Zithoek: Backyard Makeover - Thrift Duiken
- RUКак сделать яму огня Гостиный уголок: Backyard Makeover - бережливость Дайвинг
- PLJak zrobić Fire Pit ogródek: Backyard Makeover - Thrift Diving
- JA - スリフトダイビング裏庭変身:ファイアピットシーティングエリアを作る方法
- ARكيف اصنع حفرة النار جلوس: الفناء تحول - التوفير الغوص
- HI- बचत डाइविंग पिछवाड़े बदलाव: एक आग गड्ढे बैठने का स्थान बनाने के लिए कैसे
- IDCara Membuat Api Pit Seating Area: Backyard Makeover - Thrift Diving