Playback starts YouTube’s embedded player (privacy-enhanced mode).
How to Tie a Hangman's Noose Knot
ChannelHowcastIn brief
Master the Hangman’s Noose Knot—a shock-absorbing, iconic knot—with this quick guide. You’ll shape a rope into a secure loop in under two minutes, ideal for anyone learning practical ropework.
Key steps
- Form a large left-tipped U-shape (bight) with the rope’s end.
- Create a second bight opposite the first, making an S-shape with three parallel legs.
- Thread the rope end under all three legs, then wrap it over them once.
- Coil the end around the three legs six more times, tightening each turn.
- Pull the rope’s end through the loop from front to back.
- Tighten by pulling down on the right edge of the noose.
Questions & answers
How much rope do I need?
At least seven turns require extra length; leave plenty after the first bight.
Can I use fewer than seven turns?
No—the creator says seven turns are the minimum for a secure knot.
Description from the creator
Full Playlist: youtube.com/playlist?list=PLLALQuK1NDri8glByoD6…
-
-
Watch more How to Tie Knots videos: howcast.com/videos/70-How-to-Tie-a-Hangmans-Noo…
Probably the most iconic of knots, this knot is easy to make and absorbs movement and shock extremely well.
Step 1: Create bight
Create a large "U"-shaped bend—or "bight" tipped on its left side—with the end of the rope.
Tip
This knot requires a minimum of seven turns, so leave plenty of rope after your bight to work with.
Step 2: Create another bight
Create another bight at the end of the first one bending back in the opposite direction. The rope should look like an "S," with all three legs parallel to each other.
Step 3: Wrap end over legs
Put the end of the rope under all three legs, and then wrap the end over the three legs. This is considered one "turn."
Step 4: Continue wrapping
Continue wrapping the end of the rope around all three legs (coiling it upwards) at least six more times, tightening each turn one by one as you make it.
Tip
You can make more than seven turns, but always use an odd number so you can finish off the knot properly.
Step 5: Finish turns
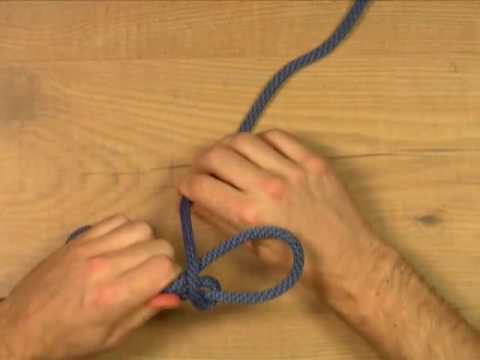
When you're done making your turns, there should be a little bit of rope left over at the end, and the top of the second bight should be just poking out above the topmost turn, forming a loop.
Step 6: Pass end through loop
Pass the very end of the rope through this loop from front to back.
Step 7: Tighten
To tighten, pull down on the right-hand edge of the noose created by the first bight.
Did You Know?
Being a hangman or executioner used to be a family profession in France.
-
-
Watch more How to Tie Knots videos: howcast.com/videos/70-How-to-Tie-a-Hangmans-Noo…
Probably the most iconic of knots, this knot is easy to make and absorbs movement and shock extremely well.
Step 1: Create bight
Create a large "U"-shaped bend—or "bight" tipped on its left side—with the end of the rope.
Tip
This knot requires a minimum of seven turns, so leave plenty of rope after your bight to work with.
Step 2: Create another bight
Create another bight at the end of the first one bending back in the opposite direction. The rope should look like an "S," with all three legs parallel to each other.
Step 3: Wrap end over legs
Put the end of the rope under all three legs, and then wrap the end over the three legs. This is considered one "turn."
Step 4: Continue wrapping
Continue wrapping the end of the rope around all three legs (coiling it upwards) at least six more times, tightening each turn one by one as you make it.
Tip
You can make more than seven turns, but always use an odd number so you can finish off the knot properly.
Step 5: Finish turns
When you're done making your turns, there should be a little bit of rope left over at the end, and the top of the second bight should be just poking out above the topmost turn, forming a loop.
Step 6: Pass end through loop
Pass the very end of the rope through this loop from front to back.
Step 7: Tighten
To tighten, pull down on the right-hand edge of the noose created by the first bight.
Did You Know?
Being a hangman or executioner used to be a family profession in France.
About this tutorial
Howcast published this 1:43 video tutorial on November 8, 2010. It has been watched 2,692,872 times on YouTube.
- Channel
- Howcast
- Category
- Howto & Style
- Duration
- 1:43
- Published
- November 8, 2010
- Views
- 2,692,872
- Likes
- 24,185
Tags
Share
This tutorial in other languages
- FRComment attacher Noose noeud d'un Hangman
- ESCómo atar un nudo de ahorcado Soga
- PTComo amarrar um Hangman Noose Nó
- ITCome legare Noose Nodo del Hangman
- DEWie Tie eine Schlinge Knot Hangman
- NLHoe maak je Noose Knot een Hangman's Tie
- RUКак завязать палач NOOSE Узел
- PLJak zawiązać pętlę Kata Knot
- JAハングマンの縄の結び目を作る方法
- ARكيفية ربطة عنق الجلاد في أنشوطة العقدة
- HIकैसे एक जल्लाद फंदा शादी करने
- IDCara Ikatkan Hangman ini Noose Knot