Playback starts YouTube’s embedded player (privacy-enhanced mode).
How to Create a Clipping Mask | Adobe Illustrator
ChannelHowcastDescription from the creator
Full Playlist: youtube.com/playlist?list=PLLALQuK1NDrgj2MPms5i…
-
-
Watch more How to Use Adobe Illustrator videos: howcast.com/videos/513800-How-to-Create-a-Clipp…
This is how to create a clipping mask in Adobe Illustrator.
So sometimes, when we have artwork on the board, we want to make a clipping mask. Essentially what a clipping mask is, it's like, think of it like a window to a house. And you wanna open that window so you can actually see everything that's inside or within that window frame. So that's what a clipping mask is.
And let's go to our Tools panel and we'll draw out some rectangles. We love rectangles. Like happy little trees, rectangles. So let's draw a couple more. Let's make a little one and make it yellow. Alright.
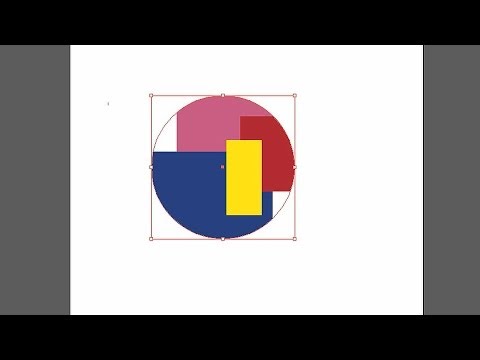
So essentially, again, what a clipping mask does, it's like a window. And it will only show you what is within the frame of that window itself. So we're gonna use a circle as our clipping mask. And what we'll do is we'll go over to our tools, we'll clip the rectangle and hold it down. And we'll go down to the ellipse tool. And we can create, let's create a regular size circle. And let's make this circle black. Alright.
Now, what we can do is we can place this circle anywhere we want on our art board. And then we're gonna select all of our art. We can either drag a marquee tool around it or a selection tool around it or we can just click on the layer itself in the circle icon over to the right. And once we do that, we can either hit command seven or control seven, depending on whether you're on a Windows or a Mac, and you'll notice that you now have a clipping mask.
Now, what that does again it's like a window. That window will only show you what's inside that mask. Alright? So if you wanna move things around that are inside the mask, simple thing. You double click on it and you go inside. Click the item. Move them around so that they're in different area but they're still within the bounds of the circle.
Now, if you wanna change that circle, all you have to do is you use your selection tool, you can highlight the circle. You can move it and now it will show a different area. Move it again. Or you can actually change the shape by selecting an anchor point using your selection tool, your direct selection tool. Click it and you can alter the shape. And now you have an even different mask. You can double click or hit the escape button to get out.
And that's how you create clipping masks in Adobe Illustrator.
-
-
Watch more How to Use Adobe Illustrator videos: howcast.com/videos/513800-How-to-Create-a-Clipp…
This is how to create a clipping mask in Adobe Illustrator.
So sometimes, when we have artwork on the board, we want to make a clipping mask. Essentially what a clipping mask is, it's like, think of it like a window to a house. And you wanna open that window so you can actually see everything that's inside or within that window frame. So that's what a clipping mask is.
And let's go to our Tools panel and we'll draw out some rectangles. We love rectangles. Like happy little trees, rectangles. So let's draw a couple more. Let's make a little one and make it yellow. Alright.
So essentially, again, what a clipping mask does, it's like a window. And it will only show you what is within the frame of that window itself. So we're gonna use a circle as our clipping mask. And what we'll do is we'll go over to our tools, we'll clip the rectangle and hold it down. And we'll go down to the ellipse tool. And we can create, let's create a regular size circle. And let's make this circle black. Alright.
Now, what we can do is we can place this circle anywhere we want on our art board. And then we're gonna select all of our art. We can either drag a marquee tool around it or a selection tool around it or we can just click on the layer itself in the circle icon over to the right. And once we do that, we can either hit command seven or control seven, depending on whether you're on a Windows or a Mac, and you'll notice that you now have a clipping mask.
Now, what that does again it's like a window. That window will only show you what's inside that mask. Alright? So if you wanna move things around that are inside the mask, simple thing. You double click on it and you go inside. Click the item. Move them around so that they're in different area but they're still within the bounds of the circle.
Now, if you wanna change that circle, all you have to do is you use your selection tool, you can highlight the circle. You can move it and now it will show a different area. Move it again. Or you can actually change the shape by selecting an anchor point using your selection tool, your direct selection tool. Click it and you can alter the shape. And now you have an even different mask. You can double click or hit the escape button to get out.
And that's how you create clipping masks in Adobe Illustrator.
About this tutorial
Howcast published this 3:11 video tutorial on November 10, 2014. It has been watched 101,571 times on YouTube.
- Channel
- Howcast
- Category
- Science & Technology
- Duration
- 3:11
- Published
- November 10, 2014
- Views
- 101,571
- Likes
- 598
Tags
Share
This tutorial in other languages
- FRComment créer un masque de détourage | Adobe Illustrator
- ESCómo crear una máscara de recorte | Ilustrador Adobe
- PTComo criar uma máscara de corte | Adobe Illustrator
- ITCome creare una maschera di ritaglio | Adobe Illustrator
- DEWie eine Schnittmaske erstellen | Adobe Illustrator
- NLHoe maak je een Uitknipmasker maken | Adobe Illustrator
- RUКак создать обтравочную маску | Adobe Illustrator
- PLJak utworzyć maskę wycinek | Adobe Illustrator
- JAクリッピングマスクを作成する方法|アドビイラストレーター
- ARكيفية إنشاء قناع لقطة | أدوبي المصور
- HIकैसे एक कतरन मुखौटा बनाने के लिए | एडोब इलस्ट्रेटर
- IDCara Membuat Clipping Mask | Adobe Illustrator