Playback starts YouTube’s embedded player (privacy-enhanced mode).
How to Capture Image from Video in Windows Movie Maker
ChannelHOWTECHDescription from the creator
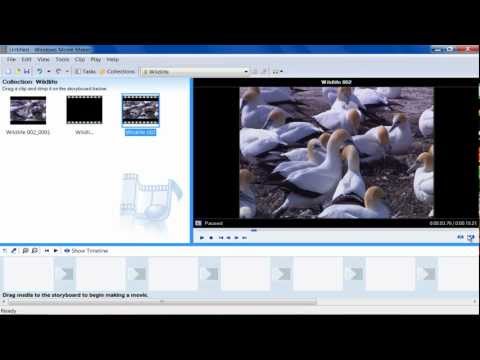
Follow this step by step tutorial to learn how to take a snapshot and capture images from a video by using Windows Movie Maker.
Don't forget to check out our site howtech.tv/ for more free how-to videos!
youtube.com/ithowtovids - our feed
facebook.com/howtechtv - join us on facebook
plus.google.com/103440382717658277879 - our group in Google+
Windows Movie Maker is one of the most advanced multimedia editing software available nowadays. It offers an extensive variety of tools and functions to edit and manipulate your videos. You can add different movie clips and make them a single movie by inserting its title, captions, and subtitles etc. Movie Maker also allows you to create various effects in a movie to improve its result. It allows you to take an image, capture a video so that it can be used for further editing. A single screenshot can also be taken from the Movie Maker from any part of the film. Here we will show you few methods to capture image from a video by using Windows Movie Maker.
Step # 1 -- Import a Video
In this tutorial, we will guide you on how to capture image from video by using Windows Movie Maker. First of all, open up the Windows Movie Maker, go to the "File" menu and click on the "Import into Collections" option. Now select your video to import it into collections.
Step # 2 -- Take Picture from the Preview
Once it is loaded, double click on the movie thumbnail to start playing it. Now click on the "Pause" button to pause the streaming where you want to capture the image. Go to the "Tools" menu and select the "Take Picture from Preview" option from the list. Choose a location on your computer, enter the image name and click on the "Save" button to save the captured image.
Now though this, you can save an image and capture video portions that you love in a still form.
Step # 3 -- Take a Snapshot from a Shortcut
You can capture an image from a video by clicking on the small camera button at the bottom right corner of the preview window. Once it has saved, you can open the captured image file and use it further with other programs.
Don't forget to check out our site howtech.tv/ for more free how-to videos!
youtube.com/ithowtovids - our feed
facebook.com/howtechtv - join us on facebook
plus.google.com/103440382717658277879 - our group in Google+
Windows Movie Maker is one of the most advanced multimedia editing software available nowadays. It offers an extensive variety of tools and functions to edit and manipulate your videos. You can add different movie clips and make them a single movie by inserting its title, captions, and subtitles etc. Movie Maker also allows you to create various effects in a movie to improve its result. It allows you to take an image, capture a video so that it can be used for further editing. A single screenshot can also be taken from the Movie Maker from any part of the film. Here we will show you few methods to capture image from a video by using Windows Movie Maker.
Step # 1 -- Import a Video
In this tutorial, we will guide you on how to capture image from video by using Windows Movie Maker. First of all, open up the Windows Movie Maker, go to the "File" menu and click on the "Import into Collections" option. Now select your video to import it into collections.
Step # 2 -- Take Picture from the Preview
Once it is loaded, double click on the movie thumbnail to start playing it. Now click on the "Pause" button to pause the streaming where you want to capture the image. Go to the "Tools" menu and select the "Take Picture from Preview" option from the list. Choose a location on your computer, enter the image name and click on the "Save" button to save the captured image.
Now though this, you can save an image and capture video portions that you love in a still form.
Step # 3 -- Take a Snapshot from a Shortcut
You can capture an image from a video by clicking on the small camera button at the bottom right corner of the preview window. Once it has saved, you can open the captured image file and use it further with other programs.
About this tutorial
HOWTECH published this 0:47 video tutorial on November 2, 2013. It has been watched 73,258 times on YouTube.
- Channel
- HOWTECH
- Category
- Howto & Style
- Duration
- 0:47
- Published
- November 2, 2013
- Views
- 73,258
- Likes
- 117
Share
This tutorial in other languages
- FRComment faire pour capturer l'image de la vidéo dans Windows Movie Maker
- ESCómo capturar la imagen de vídeo en Windows Movie Maker
- PTComo a captura de imagem de vídeo no Windows Movie Maker
- ITCome acquisire un'immagine dal video in Windows Movie Maker
- DEWie Bild von Video in Windows Movie Maker auf Capture
- NLHoe kan ik beelden uit een video vastleggen in Windows Movie Maker
- RUКак Захват изображения с видео в Windows Movie Maker
- PLJak przechwycić obraz z wideo w programie Windows Movie Maker
- JAWindowsムービーメーカーでビデオから画像をキャプチャする方法
- ARكيفية التقاط صورة من الفيديو في Windows Movie Maker
- HIविंडोज मूवी में वीडियो से छवि कैप्चर कैसे
- IDCara Capture Gambar dari Video di Windows Movie Maker