Playback starts YouTube’s embedded player (privacy-enhanced mode).
How to Create Cloud Shapes in Photoshop (Free Download)
ChannelPHLEARNChapters
Description from the creator
▶ Download the Photoshop brush for this tutorial (free with a PHLEARN account): phlearn.com/tutorial/free-photoshop-brush-cloud…
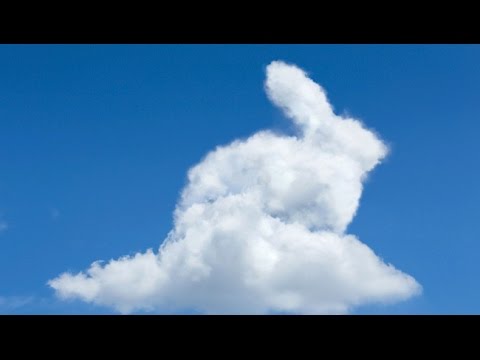
In this tutorial, Aaron shows you how to shape clouds into any form you want, in this case, a bunny, using nothing but layer masks and a custom cloud brush. The techniques here work for any shape or even text, so once you learn the process you can apply it to whatever idea you have in mind.
You'll bring in a reference image to guide your shape, duplicate real clouds from your source photo to build up coverage, then create (or download) a custom cloud shaped brush to paint in realistic, soft edges instead of a flat, unnatural outline.
CHAPTERS
00:00 Intro to shaping clouds in Photoshop
01:21 Cutting out a bunny reference shape
02:34 Selecting clouds with Color Range
04:10 Building the bunny with layer masks
06:22 Creating a custom cloud brush
08:51 Loading downloadable cloud brushes
09:57 Painting realistic cloud edges
12:30 Adding light and shadow for depth
14:25 Recap and final thoughts
THE STEPS
1. Bring in a reference image and rough cut it out with the Magic Wand tool and a layer mask
2. Select Select, then Color Range on your cloud photo to isolate the light areas
3. Duplicate the selection to a new layer with Ctrl/Cmd+J and set the blend mode to Lighten
4. Duplicate that cloud layer several times to build up coverage for your whole shape
5. To build a custom brush, duplicate a cloud to a new document, lock transparency, fill with black on a white background, then go to Edit, then Define Brush Preset
6. Use the cloud brush with layer masks (black to hide, white to reveal) to paint natural, cloud textured edges onto your shape
7. Add Curves adjustment layers to brighten the top and darken the bottom for extra dimension
―
PHLEARN PRO: every PRO tutorial, one membership
◦ 200+ in-depth courses and masterclasses on Photoshop, Lightroom and photography
◦ 1,000+ downloadable PSDs, RAW images and sample files to follow along
◦ Presets, Photoshop actions and LUTs included
◦ New PRO tutorials every month, streamed in 4K with captions and chapters
◦ Rated 4.93/5 by 3,900+ students
◦ Cancel anytime, 100% money-back guarantee
▶ phlearn.com/pro
―
Follow PHLEARN:
Instagram: instagram.com/phlearn/
Facebook: facebook.com/phlearn
Twitter: twitter.com/phlearn
#Photoshop #PhotoManipulation #DigitalArt
In this tutorial, Aaron shows you how to shape clouds into any form you want, in this case, a bunny, using nothing but layer masks and a custom cloud brush. The techniques here work for any shape or even text, so once you learn the process you can apply it to whatever idea you have in mind.
You'll bring in a reference image to guide your shape, duplicate real clouds from your source photo to build up coverage, then create (or download) a custom cloud shaped brush to paint in realistic, soft edges instead of a flat, unnatural outline.
CHAPTERS
00:00 Intro to shaping clouds in Photoshop
01:21 Cutting out a bunny reference shape
02:34 Selecting clouds with Color Range
04:10 Building the bunny with layer masks
06:22 Creating a custom cloud brush
08:51 Loading downloadable cloud brushes
09:57 Painting realistic cloud edges
12:30 Adding light and shadow for depth
14:25 Recap and final thoughts
THE STEPS
1. Bring in a reference image and rough cut it out with the Magic Wand tool and a layer mask
2. Select Select, then Color Range on your cloud photo to isolate the light areas
3. Duplicate the selection to a new layer with Ctrl/Cmd+J and set the blend mode to Lighten
4. Duplicate that cloud layer several times to build up coverage for your whole shape
5. To build a custom brush, duplicate a cloud to a new document, lock transparency, fill with black on a white background, then go to Edit, then Define Brush Preset
6. Use the cloud brush with layer masks (black to hide, white to reveal) to paint natural, cloud textured edges onto your shape
7. Add Curves adjustment layers to brighten the top and darken the bottom for extra dimension
―
PHLEARN PRO: every PRO tutorial, one membership
◦ 200+ in-depth courses and masterclasses on Photoshop, Lightroom and photography
◦ 1,000+ downloadable PSDs, RAW images and sample files to follow along
◦ Presets, Photoshop actions and LUTs included
◦ New PRO tutorials every month, streamed in 4K with captions and chapters
◦ Rated 4.93/5 by 3,900+ students
◦ Cancel anytime, 100% money-back guarantee
▶ phlearn.com/pro
―
Follow PHLEARN:
Instagram: instagram.com/phlearn/
Facebook: facebook.com/phlearn
Twitter: twitter.com/phlearn
#Photoshop #PhotoManipulation #DigitalArt
About this tutorial
PHLEARN published this 16:34 video tutorial on November 4, 2016. It has been watched 185,240 times on YouTube.
Tags
Share
This tutorial in other languages
- FRComment faire pour créer des formes de Cloud dans Photoshop (Téléchargement gratuit)
- ESCómo crear la nube Las formas en Photoshop (descarga gratuita)
- PTComo criar formas da nuvem no Photoshop (Free Download)
- ITCome creare cloud forme in Photoshop (Download)
- DESo erstellen Sie Cloud-Formen in Photoshop (Free Download)
- NLHoe maak je Cloud Shapes in Photoshop (Free Download)
- RUКак создать облачные фигуры в Photoshop (скачать бесплатно)
- PLJak tworzyć kształty chmura w Photoshopie (Download)
- JAPhotoshopで雲シェイプを作成する方法(無料ダウンロード)
- ARكيفية إنشاء سحابة الأشكال في فوتوشوب (تحميل مجاني)
- HIPhotoshop में बादल आकार बनाने के लिए कैसे (नि: शुल्क डाउनलोड)
- IDCara Membuat Cloud Bentuk dalam Photoshop (Download)