Playback starts YouTube’s embedded player (privacy-enhanced mode).
How to Remove Acne in Photoshop
ChannelPHLEARNIn brief
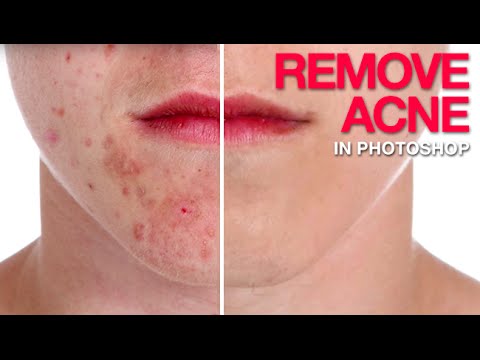
You’ll learn to edit photos in Photoshop so acne and redness disappear naturally, not unnaturally. The method splits the task into two phases—neutralizing redness first, then removing blemishes—before restoring a subtle, lifelike flush. Perfect for retouching portraits where skin should look smooth but not artificial.
Key steps
- Use a Hue/Saturation adjustment layer to reduce redness in the skin.
- Set the Spot Healing Brush to Content-Aware and Sample All Layers for non-destructive edits.
- Paint over small blemishes first, then larger areas to even out skin tone.
- Sample a soft red from the lips on a new layer to reintroduce natural color.
- Adjust the blend mode to Soft Light and opacity (20–50%) for a balanced finish.
Questions & answers
Do I need the practice files to follow along?
No—the steps are demonstrated on a sample image, but free practice files are available with a PHLEARN account.
Chapters
Description from the creator
▶ Download the practice files for this tutorial (free with a PHLEARN account): phlearn.com/tutorial/remove-acne-in-photoshop/
Remove acne and blemishes in Photoshop without leaving skin looking flat or fake. The trick is splitting the job into two separate problems: get rid of the redness first, then remove the blemishes themselves — and add a touch of realistic red back in at the end.
CHAPTERS
00:00 Why acne removal is really a two-step problem
01:37 Removing redness with a Hue/Saturation adjustment layer
04:29 Removing blemishes with the Spot Healing Brush
07:25 Adding realistic red back into the skin
08:19 Before and after
THE STEPS
1. Add a Hue/Saturation adjustment layer and target the reds specifically to pull the redness out of the skin.
2. Grab the Spot Healing Brush, and in the options bar turn on Content-Aware and Sample All Layers so you can work non-destructively on a new layer.
3. Paint over the smaller blemishes first, then zoom out and paint over larger areas to even out uneven skin tone.
4. Once the acne and redness are gone, sample a soft red from the lips on a new layer and paint it back over the face.
5. Set that layer's blend mode to Soft Light and lower the opacity to roughly 20–50% until the skin reads as natural instead of flat.
Read the full step-by-step tutorial:
phlearn.com/tutorial/remove-acne-in-photoshop/
―
PHLEARN PRO: every PRO tutorial, one membership
◦ 200+ in-depth courses and masterclasses on Photoshop, Lightroom and photography
◦ 1,000+ downloadable PSDs, RAW images and sample files to follow along
◦ Presets, Photoshop actions and LUTs included
◦ New PRO tutorials every month, streamed in 4K with captions and chapters
◦ Rated 4.93/5 by 3,900+ students
◦ Cancel anytime, 100% money-back guarantee
▶ phlearn.com/pro
―
Follow us on social!
Instagram: instagram.com/phlearn/
Facebook: facebook.com/phlearn
Twitter: twitter.com/phlearn
Remove acne and blemishes in Photoshop without leaving skin looking flat or fake. The trick is splitting the job into two separate problems: get rid of the redness first, then remove the blemishes themselves — and add a touch of realistic red back in at the end.
CHAPTERS
00:00 Why acne removal is really a two-step problem
01:37 Removing redness with a Hue/Saturation adjustment layer
04:29 Removing blemishes with the Spot Healing Brush
07:25 Adding realistic red back into the skin
08:19 Before and after
THE STEPS
1. Add a Hue/Saturation adjustment layer and target the reds specifically to pull the redness out of the skin.
2. Grab the Spot Healing Brush, and in the options bar turn on Content-Aware and Sample All Layers so you can work non-destructively on a new layer.
3. Paint over the smaller blemishes first, then zoom out and paint over larger areas to even out uneven skin tone.
4. Once the acne and redness are gone, sample a soft red from the lips on a new layer and paint it back over the face.
5. Set that layer's blend mode to Soft Light and lower the opacity to roughly 20–50% until the skin reads as natural instead of flat.
Read the full step-by-step tutorial:
phlearn.com/tutorial/remove-acne-in-photoshop/
―
PHLEARN PRO: every PRO tutorial, one membership
◦ 200+ in-depth courses and masterclasses on Photoshop, Lightroom and photography
◦ 1,000+ downloadable PSDs, RAW images and sample files to follow along
◦ Presets, Photoshop actions and LUTs included
◦ New PRO tutorials every month, streamed in 4K with captions and chapters
◦ Rated 4.93/5 by 3,900+ students
◦ Cancel anytime, 100% money-back guarantee
▶ phlearn.com/pro
―
Follow us on social!
Instagram: instagram.com/phlearn/
Facebook: facebook.com/phlearn
Twitter: twitter.com/phlearn
About this tutorial
PHLEARN published this 9:47 video tutorial on October 25, 2014. It has been watched 2,671,034 times on YouTube.
Tags
Share
This tutorial in other languages
- FRComment faire pour supprimer l'acné dans Photoshop
- ESCómo eliminar el acné en Photoshop
- PTComo remover Acne em Photoshop
- ITCome rimuovere Acne in Photoshop
- DEWie Entfernen von Akne in Photoshop
- NLHoe te Acne verwijderen in Photoshop
- RUКак удалить прыщи в фотошопе
- PLJak usunąć trądzik w Photoshopie
- JAPhotoshopでにきびを削除する方法
- ARكيفية إزالة حب الشباب في برنامج فوتوشوب
- HIकैसे Photoshop में मुँहासे निकालें
- IDCara Hapus Jerawat di Photoshop