Playback starts YouTube’s embedded player (privacy-enhanced mode).
Tyre Puncture Repair Kit Tutorial
ChannelScrewsNutsAndBoltsIn brief
You’ll learn how to temporarily repair a puncture in a tubeless car tyre using a plug kit, allowing you to drive safely to a tyre shop for professional patching. The process is shown for the main tread area only, with clear safety warnings about when not to attempt it. Best for drivers needing an emergency fix before expert help.
Description from the creator
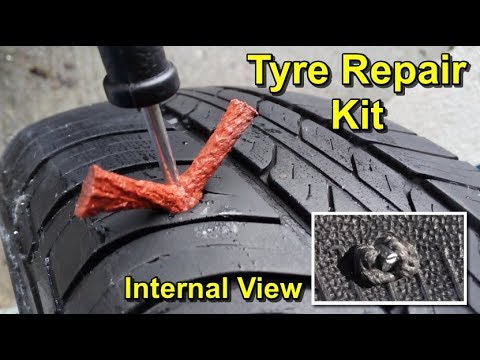
Fixing a puncture in a tubeless car tyre using a puncture repair kit (tire plug kit). In this video I am only demonstrating how to use the repair kit. I am not recommending the use of the kit as a replacement for a professional tyre shop repair but as a temporary repair to get you to a tyre shop and have it patched professionally. At the end of the video you can see what the process looks like from inside the tyre. The tyre in this video had no air in it so it was safe to take the screw out using a screwdriver. If there is air in the tyre, get a good grip on the screw or nail with a pair of pliers and carefully pull it it out. I would highly recommend wearing safety goggles as you remove it.
NOTE: This kit is designed for tubeless tires and any repairs should only be carried out on the main treaded area of the tire and NOT on the shoulder or sidewall sections. This should only used as a temporary repair to get you to a tire shop to have the tire inspected and patched internally. This is not intended to be a long-term fix or a replacement for a professional tire repair. I am only demonstrating how to use the repair kit, I have nothing to do with its design or manufacture. WARNING: Use of this product could void tire warranty. Do NOT attempt any type of tire repair if any of the following conditions exist:
• The tire has less than 1.6mm tread depth
• The puncture is greater than 1/4 inch diameter (6mm)
• There is structural damage to tread, carcass, inner liner, or bead (including cracking, bubbling, ply separation, etc.)
• The puncture is on the shoulder or sidewall of the tire
• The tire has been inflated with any flammable gas
• The perforating object cannot be located
• The perforating object is not straight indicating the puncture path is not straight
• There is little resistance felt when inserting the repair
• There is evidence that the tire has been driven under-inflated
• There is evidence of possible structure/internal damage.
If you find my videos helpful, please donate to my channel at paypal.me/Screwsnutsandbolts
Thanks for watching. Please comment, like and subscribe !.
~~~~ Tyre Repair Kit Link ~~~~
As an Amazon Associate I earn from qualifying purchases.
🚗 Tyre Plug Kit ~ amzn.to/3OjGScp
🚗 Tire Repair Strips ~ amzn.to/3b6Jm0h
🚗 12 Volt Tire Pump ~ amzn.to/3c1qjF2
Disclaimer: Screwsnutsandbolts is a participant in the Amazon Services LLC Associates Program, an affiliate advertising program designed to provide a means for sites to earn advertising fees by advertising and linking to www.amazon.com
All of my uploaded material is protected under copyright law. None of my videos may be re-uploaded, reproduced or transmitted, in part or in full, in any form or by any means, without the written permission of the copyright holder.
©Youtube.com/Screwsnutsandbolts 2022
Read important information below:
Disclaimer
Under no circumstances will Screwsnutsandbolts be responsible or liable in any way for any content, including but not limited to, any errors or omissions in the content, or for any loss or damage of any kind incurred as a result of any content communicated in this video, whether by Screwsnutsandbolts or a third party. In no event shall Screwsnutsandbolts be liable for any special, indirect or consequential damages or any damages whatsoever resulting from loss of use, data or profits arising out of or in connection with the availability, use or performance of any information communicated in this video. Due to factors beyond the control of Screwsnutsandbolts, it cannot guarantee against improper use or unauthorized modifications of this information. Screwsnutsandbolts assumes no liability for property damage or injury incurred as a result of any of the information contained in this video. Use this information at your own risk. Screwsnutsandbolts recommends safe practices when performing any do it yourself repairs and or with tools seen or implied in this video. Due to factors beyond the control of Screwsnutsandbolts, no information contained in this video shall create any expressed or implied warranty or guarantee of any particular result. Any injury, damage, or loss that may result from improper use of these tools, equipment, or from the information contained in this video is the sole responsibility of the user and not Screwsnutsandbolts.
Tire plug kit
Tyre plug kit
Mushroom plug tire repair
Tire repair kit
Tyre repair kit
Puncture repair
Tire puncture repair
Car tire repair
Motorcycle tire repair
Van tire repair
Truck tire repair
Puncture repair kit
Tire fix
Best puncture repair
Quickest puncture repair
Easiest puncture repair
Quick tire fix
Quick puncture repair
Easy puncture repair
Tyre fix
Puncture fix
Tire plugging
Tyre plugging
Tire
Tires
Tyre
Tyres
Puncture
Punctures
Repair
Repairs
NOTE: This kit is designed for tubeless tires and any repairs should only be carried out on the main treaded area of the tire and NOT on the shoulder or sidewall sections. This should only used as a temporary repair to get you to a tire shop to have the tire inspected and patched internally. This is not intended to be a long-term fix or a replacement for a professional tire repair. I am only demonstrating how to use the repair kit, I have nothing to do with its design or manufacture. WARNING: Use of this product could void tire warranty. Do NOT attempt any type of tire repair if any of the following conditions exist:
• The tire has less than 1.6mm tread depth
• The puncture is greater than 1/4 inch diameter (6mm)
• There is structural damage to tread, carcass, inner liner, or bead (including cracking, bubbling, ply separation, etc.)
• The puncture is on the shoulder or sidewall of the tire
• The tire has been inflated with any flammable gas
• The perforating object cannot be located
• The perforating object is not straight indicating the puncture path is not straight
• There is little resistance felt when inserting the repair
• There is evidence that the tire has been driven under-inflated
• There is evidence of possible structure/internal damage.
If you find my videos helpful, please donate to my channel at paypal.me/Screwsnutsandbolts
Thanks for watching. Please comment, like and subscribe !.
~~~~ Tyre Repair Kit Link ~~~~
As an Amazon Associate I earn from qualifying purchases.
🚗 Tyre Plug Kit ~ amzn.to/3OjGScp
🚗 Tire Repair Strips ~ amzn.to/3b6Jm0h
🚗 12 Volt Tire Pump ~ amzn.to/3c1qjF2
Disclaimer: Screwsnutsandbolts is a participant in the Amazon Services LLC Associates Program, an affiliate advertising program designed to provide a means for sites to earn advertising fees by advertising and linking to www.amazon.com
All of my uploaded material is protected under copyright law. None of my videos may be re-uploaded, reproduced or transmitted, in part or in full, in any form or by any means, without the written permission of the copyright holder.
©Youtube.com/Screwsnutsandbolts 2022
Read important information below:
Disclaimer
Under no circumstances will Screwsnutsandbolts be responsible or liable in any way for any content, including but not limited to, any errors or omissions in the content, or for any loss or damage of any kind incurred as a result of any content communicated in this video, whether by Screwsnutsandbolts or a third party. In no event shall Screwsnutsandbolts be liable for any special, indirect or consequential damages or any damages whatsoever resulting from loss of use, data or profits arising out of or in connection with the availability, use or performance of any information communicated in this video. Due to factors beyond the control of Screwsnutsandbolts, it cannot guarantee against improper use or unauthorized modifications of this information. Screwsnutsandbolts assumes no liability for property damage or injury incurred as a result of any of the information contained in this video. Use this information at your own risk. Screwsnutsandbolts recommends safe practices when performing any do it yourself repairs and or with tools seen or implied in this video. Due to factors beyond the control of Screwsnutsandbolts, no information contained in this video shall create any expressed or implied warranty or guarantee of any particular result. Any injury, damage, or loss that may result from improper use of these tools, equipment, or from the information contained in this video is the sole responsibility of the user and not Screwsnutsandbolts.
Tire plug kit
Tyre plug kit
Mushroom plug tire repair
Tire repair kit
Tyre repair kit
Puncture repair
Tire puncture repair
Car tire repair
Motorcycle tire repair
Van tire repair
Truck tire repair
Puncture repair kit
Tire fix
Best puncture repair
Quickest puncture repair
Easiest puncture repair
Quick tire fix
Quick puncture repair
Easy puncture repair
Tyre fix
Puncture fix
Tire plugging
Tyre plugging
Tire
Tires
Tyre
Tyres
Puncture
Punctures
Repair
Repairs
About this tutorial
ScrewsNutsAndBolts published this 4:10 video tutorial on November 14, 2019. It has been watched 7,029,141 times on YouTube.
- Channel
- ScrewsNutsAndBolts
- Category
- Autos & Vehicles
- Duration
- 4:10
- Published
- November 14, 2019
- Views
- 7,029,141
- Likes
- 70,114
Share
This tutorial in other languages
- FRKit de réparation des pneus Crevaison Tutorial
- ESPunción de neumáticos Kit de reparación Tutorial
- PTTire Puncture Repair Kit Tutorial
- ITTire riparazione forature Kit Tutorial
- DEReifenreparatursatz Tutorial
- NLTire Reparatieset Tutorial
- RUШина Прокол Ремкомплект Руководство
- PLOpona przebicie Zestaw naprawczy Tutorial
- JAタイヤパンク修理キットチュートリアル
- ARإصلاح الإطارات ثقب عدة دروس
- HIटायर पंचर मरम्मत किट ट्यूटोरियल
- IDBan Tusukan Repair Kit Tutorial