Playback starts YouTube’s embedded player (privacy-enhanced mode).
How to Make Peony Petals | Sugar Flowers
ChannelHowcastFoodDrinkDescription from the creator
Watch more How to Make Simple Sugar Paste Flowers videos: howcast.com/videos/509778-How-to-Make-Peony-Pet…
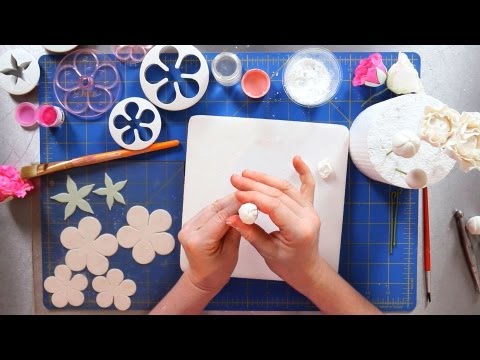
Once it's dry it turns into something that's super-hard. Now, I can start to build up the petals. So what I've done is roll out, using a pasta machine I've rolled out some gum paste in order to create my petals, and I've cut it with just a simple five-petal cutter. My five-petal cutter traced out the shape and now I'm ready to create the petals.
When I approach the petals, I like to make sure that my petals are super-thin. I think that it makes for a more realistic-looking flower. So I want to tuck the edges. The technique that I use is as if I'm snapping, I'm going to pinch and roll the edges of the petals with my first finger and my thumb.
In order to do that, though, I need to make sure that my fingers are dusted in powdered sugar. I don't want my fingers to stick. I'm going to take and pinch and roll all the way around all five petals, so just pinching and rolling, pulling the top edge out and tucking the bottom edge under all the way around.
Once I have that all pinched out, I turned it upside down. I'm going to pierce my wire through the center of my petals and I want to add a little bit of glue to make sure that this piece is going to stick. I'll take a little paintbrush, add a little bit of my edible glue. Edible glue is a mixture of gum arabic and water. Gum arabic is just going to give it a little bit of extra stick.
Then I'm able to fold all of the petals up onto my center, overlapping each one. I put the first one down and then I put the second one on top of that. I'm working all the way around the circle. When I get to my last petal, each petal has to be on top of the next petal. So I need to pull my first petal up just a little bit so that my last petal can tuck underneath it.
It goes on top of the fourth petal and then underneath the first one. Once I have all my petals situated I can push them down, and you'll notice I may have a little bit of extra all the way at the bottom. I'm just going to pinch any extra that I have and pull that off of my wire. Then, I can start to smooth my gum paste out.
What I need to worry about at this point is just what the top looks like because later on when I continue my flower, that will be covered up. So any extra I can just pinch off and smooth out. Once I have the petals completely overlapped and completely covering that center, I'm going to leave this to rest overnight to dry for 24 hours. Then I can start to add my petals to create my bud.
Once it's dry it turns into something that's super-hard. Now, I can start to build up the petals. So what I've done is roll out, using a pasta machine I've rolled out some gum paste in order to create my petals, and I've cut it with just a simple five-petal cutter. My five-petal cutter traced out the shape and now I'm ready to create the petals.
When I approach the petals, I like to make sure that my petals are super-thin. I think that it makes for a more realistic-looking flower. So I want to tuck the edges. The technique that I use is as if I'm snapping, I'm going to pinch and roll the edges of the petals with my first finger and my thumb.
In order to do that, though, I need to make sure that my fingers are dusted in powdered sugar. I don't want my fingers to stick. I'm going to take and pinch and roll all the way around all five petals, so just pinching and rolling, pulling the top edge out and tucking the bottom edge under all the way around.
Once I have that all pinched out, I turned it upside down. I'm going to pierce my wire through the center of my petals and I want to add a little bit of glue to make sure that this piece is going to stick. I'll take a little paintbrush, add a little bit of my edible glue. Edible glue is a mixture of gum arabic and water. Gum arabic is just going to give it a little bit of extra stick.
Then I'm able to fold all of the petals up onto my center, overlapping each one. I put the first one down and then I put the second one on top of that. I'm working all the way around the circle. When I get to my last petal, each petal has to be on top of the next petal. So I need to pull my first petal up just a little bit so that my last petal can tuck underneath it.
It goes on top of the fourth petal and then underneath the first one. Once I have all my petals situated I can push them down, and you'll notice I may have a little bit of extra all the way at the bottom. I'm just going to pinch any extra that I have and pull that off of my wire. Then, I can start to smooth my gum paste out.
What I need to worry about at this point is just what the top looks like because later on when I continue my flower, that will be covered up. So any extra I can just pinch off and smooth out. Once I have the petals completely overlapped and completely covering that center, I'm going to leave this to rest overnight to dry for 24 hours. Then I can start to add my petals to create my bud.
About this tutorial
HowcastFoodDrink published this 2:43 video tutorial on November 4, 2013. It has been watched 260,939 times on YouTube.
- Channel
- HowcastFoodDrink
- Category
- Howto & Style
- Duration
- 2:43
- Published
- November 4, 2013
- Views
- 260,939
- Likes
- 1,233
Tags
Share
This tutorial in other languages
- FRComment faire Pétales Pivoine | sucre Fleurs
- ESCómo hacer Peony pétalos | Flores de azúcar
- PTComo fazer Peony Petals | Sugar Flowers
- ITCome fare Peony petali | zucchero Fiori
- DEWie man Peony Petals | Zuckerblumen
- NLHoe maak Peony Petals | Sugar Flowers
- RUКак сделать лепестки пиона | Сахар Цветы
- PLJak zrobić Peony Płatki | cukier Kwiaty
- JA牡丹の花びらを作る方法|砂糖の花
- ARكيفية جعل الفاوانيا بتلات | السكر الزهور
- HIPeony पंखुड़ियों बनाने के लिए कैसे | चीनी फूल
- IDCara Membuat Peony Petals | gula Bunga