Playback starts YouTube’s embedded player (privacy-enhanced mode).
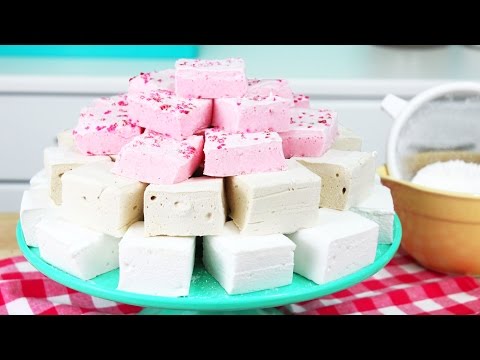
How to Make Homemade Marshmallows!
ChannelkawaiisweetworldIn brief
You’ll make soft, fluffy homemade marshmallows from scratch—far tastier than store-bought—using just a few pantry staples. This recipe yields about 16 large or 64 small marshmallows, perfect for snacking or gifting. The process involves boiling sugar syrup, whipping it with gelatin, and setting it in a pan overnight before cutting into squares.
Key steps
- Boil ½ cup water, 2 cups sugar, ½ cup corn syrup, and ½ tsp salt to 240°F (1 min).
- Bloom 3 gelatin envelopes in ½ cup cold water, then drizzle into hot syrup.
- Whip mixture on high for 8–10 minutes until thick and fluffy.
- Pour into a buttered 9x9-inch pan, smooth with plastic wrap, and set for 6+ hours.
- Cut into squares after dusting with powdered sugar and cornstarch.
Questions & answers
How many marshmallows does this recipe make?
About 16 large marshmallows or 64 one-inch squares.
Can I flavor them with coffee instead of vanilla?
Yes—replace 1 cup water with strong coffee (add 1 tsp espresso powder if desired).
Description from the creator
OPEN TO COLLAB! collabhunt.me/kawaiisweetworld
Hey guys! These homemade marshmallows are SO yummy, and much, much better than the store-bought kind! Seriously, it’s like a whole different confection :D Enjoy, and make sure you share pictures of your treats on Facebook and Instagram with the hashtag #kawaiisweetworld!
Also, be sure to check out the trailer for my NEW SERIES on ISAtv! :D Super excited about this one, click the link below to see it!
youtube.com/watch?v=kPLfv26uiEQ&spfreload=10
*Forgot to show adding in the vanilla extract, but also add in 2 T of vanilla extract after whipping marshmallows for 8-10 min if desired!
♥ Facebook: on.fb.me/14LNQ1d
♥ Instagram: instagram.com/kawaiisweeteats/
♥ Channel: bit.ly/18keK04
Homemade Marshmallows
Makes about 16 large marshmallows, or 64 one inch marshmallows
Ingredients
1 cup water
3 envelopes unflavored gelatin
2 cups granulated sugar
½ cup light corn syrup
½ tsp salt
2 T vanilla extract
1 cup powdered sugar
1 cup corn starch
Directions
1. Grease a 9” x 9” square pan with butter. Set aside.
2. In the bowl of a stand mixer, pour in ½ cup water and sprinkle gelatin on top.
3. In a medium saucepot, bring ½ cup water, granulated sugar, corn syrup, and salt to a rolling boil (rapid and large bubbles) and boil for 1 min or until a candy thermometer reads 240 F. Do not stir while mixture is cooking, and be careful! This mixture is extremely hot – ask an adult for help if you’re not comfortable handling the boiling sugar syrup.
4. Mix gelatin mixture a few times to break up the clump, and slowly drizzle in sugar syrup along side of bowl. Turn to high speed and whip for 8-10 min until thick and fluffy.
5. Immediately pour into prepared pan, and spread out with an offset spatula. Use a greased sheet of plastic wrap to smooth out marshmallow, and leave to sit for 6 hours or preferably overnight.
6. Sprinkle a work surface with powdered sugar and cornstarch mixture, and turn out marshmallow slab. Cut with a greased knife, and sprinkle with additional powdered sugar/cornstarch if needed.
For coffee marshmallows:
Replace 1 cup of water with 1 cup of strongly brewed coffee. If desired, add 1 tsp of espresso powder to whipped marshmallow mixture. Omit vanilla extract
I added ¼ cake mix for the “cake batter” marshmallows, but as I mentioned, I don’t recommend it! It deflates the marshmallows (but it does give them a cake flavor :-)
Tip: To clean saucepot, just fill with warm water and let soak for 1 hour. The sugar will dissolve quickly, and the pan will be completely clean!
Music courtesy of Audio Network “Clap Happy” and "Drive Me Home”
Hey guys! These homemade marshmallows are SO yummy, and much, much better than the store-bought kind! Seriously, it’s like a whole different confection :D Enjoy, and make sure you share pictures of your treats on Facebook and Instagram with the hashtag #kawaiisweetworld!
Also, be sure to check out the trailer for my NEW SERIES on ISAtv! :D Super excited about this one, click the link below to see it!
youtube.com/watch?v=kPLfv26uiEQ&spfreload=10
*Forgot to show adding in the vanilla extract, but also add in 2 T of vanilla extract after whipping marshmallows for 8-10 min if desired!
♥ Facebook: on.fb.me/14LNQ1d
♥ Instagram: instagram.com/kawaiisweeteats/
♥ Channel: bit.ly/18keK04
Homemade Marshmallows
Makes about 16 large marshmallows, or 64 one inch marshmallows
Ingredients
1 cup water
3 envelopes unflavored gelatin
2 cups granulated sugar
½ cup light corn syrup
½ tsp salt
2 T vanilla extract
1 cup powdered sugar
1 cup corn starch
Directions
1. Grease a 9” x 9” square pan with butter. Set aside.
2. In the bowl of a stand mixer, pour in ½ cup water and sprinkle gelatin on top.
3. In a medium saucepot, bring ½ cup water, granulated sugar, corn syrup, and salt to a rolling boil (rapid and large bubbles) and boil for 1 min or until a candy thermometer reads 240 F. Do not stir while mixture is cooking, and be careful! This mixture is extremely hot – ask an adult for help if you’re not comfortable handling the boiling sugar syrup.
4. Mix gelatin mixture a few times to break up the clump, and slowly drizzle in sugar syrup along side of bowl. Turn to high speed and whip for 8-10 min until thick and fluffy.
5. Immediately pour into prepared pan, and spread out with an offset spatula. Use a greased sheet of plastic wrap to smooth out marshmallow, and leave to sit for 6 hours or preferably overnight.
6. Sprinkle a work surface with powdered sugar and cornstarch mixture, and turn out marshmallow slab. Cut with a greased knife, and sprinkle with additional powdered sugar/cornstarch if needed.
For coffee marshmallows:
Replace 1 cup of water with 1 cup of strongly brewed coffee. If desired, add 1 tsp of espresso powder to whipped marshmallow mixture. Omit vanilla extract
I added ¼ cake mix for the “cake batter” marshmallows, but as I mentioned, I don’t recommend it! It deflates the marshmallows (but it does give them a cake flavor :-)
Tip: To clean saucepot, just fill with warm water and let soak for 1 hour. The sugar will dissolve quickly, and the pan will be completely clean!
Music courtesy of Audio Network “Clap Happy” and "Drive Me Home”
About this tutorial
kawaiisweetworld published this 4:58 video tutorial on November 5, 2015. It has been watched 2,950,475 times on YouTube.
- Channel
- kawaiisweetworld
- Category
- Howto & Style
- Duration
- 4:58
- Published
- November 5, 2015
- Views
- 2,950,475
- Likes
- 41,401
Tags
Share
This tutorial in other languages
- FRComment faire maison guimauves!
- ESCómo hacer casera Las melcochas!
- PTComo fazer caseiro Marshmallows!
- ITCome fare in casa Marshmallows!
- DEWie man Hausgemachte Marshmallows!
- NLHoe maak je zelfgemaakte Heemst!
- RUКак сделать Домашний зефир!
- PLJak zrobić Homemade Marshmallows!
- JA自家製のマシュマロを作る方法!
- ARكيفية جعل محلية الصنع أعشاب من الفصيلة الخبازية!
- HIकैसे घर का बना पकाने की विधि बनाने के लिए!
- IDCara Membuat Homemade Marshmallow!