Playback starts YouTube’s embedded player (privacy-enhanced mode).
How to Create a Simple Composite in Photoshop
ChannelPHLEARNChapters
Description from the creator
▶ Download the 4 sample images and PDF guide for this tutorial (free with a PHLEARN account): phlearn.com/tutorial/simple-composite-photoshop/
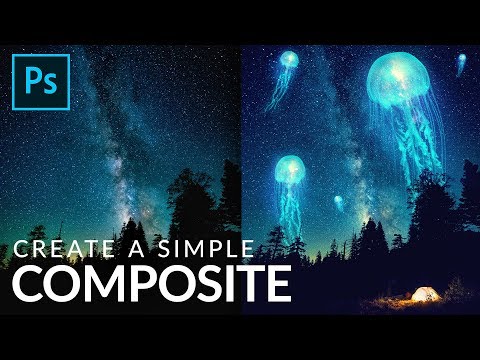
Learn how to create a fun, surreal composite in Photoshop, combining jellyfish, a starry night sky, and galaxy light effects using nothing more advanced than screen blend mode, layer masks, and a few filters.
Aaron blends jellyfish into a night sky with screen blend mode, tucks them behind the tree line with a Color Range selection turned into a layer mask, adds motion blur to match the long-exposure star trails, warps the stars behind the jellyfish with Liquify, screens in galaxy nebula images for a glowing light source, adds a tent for scale and foreground interest, then pulls it all together with a custom gradient map and a layer of grain.
CHAPTERS
00:00 Creating a simple composite in Photoshop
01:23 Adding jellyfish with a screen blend layer mask
08:05 Placing jellyfish behind the trees
10:19 Adding motion blur to match the stars
11:16 Warping stars behind jellyfish with Liquify
12:26 Adding galaxy light effects inside each jellyfish
17:07 Adding a tent for foreground scale
19:35 Bringing colors together with a gradient map
20:43 Adding grain to unify the composite
THE STEPS
1. Drag your subject onto the background and add a layer mask to hide hard edges
2. Change the blend mode to Screen so only the light areas show
3. Duplicate, flip, and warp copies to build out your composition
4. Use Select, then Color Range on the background to build a mask that tucks your subject behind foreground elements
5. Add Motion Blur to match existing motion in the background
6. Use Liquify's Bloat tool on a duplicate background layer for a warped, otherworldly look
7. Screen in extra images (galaxies, light sources) for glow and color
8. Add a foreground element for scale, clipped with a Hue/Saturation layer to adjust its color
9. Finish with a custom gradient map and a soft-light grain layer to unify everything
Get the full step by step breakdown here: phlearn.com/tutorial/simple-composite-photoshop/
Go deeper with the PHLEARN PRO course “How to Create an Epic Composite: A Dark Force (2026 Edition)”: phlearn.com/tutorial/create-an-epic-composite-a…
―
PHLEARN PRO: every PRO tutorial, one membership
◦ 200+ in-depth courses and masterclasses on Photoshop, Lightroom and photography
◦ 1,000+ downloadable PSDs, RAW images and sample files to follow along
◦ Presets, Photoshop actions and LUTs included
◦ New PRO tutorials every month, streamed in 4K with captions and chapters
◦ Rated 4.93/5 by 3,900+ students
◦ Cancel anytime, 100% money-back guarantee
▶ phlearn.com/pro
―
Follow PHLEARN:
Instagram: instagram.com/phlearn
Facebook: facebook.com/phlearn
Twitter: twitter.com/phlearn
#Photoshop #PhotoCompositing #DigitalArt
Learn how to create a fun, surreal composite in Photoshop, combining jellyfish, a starry night sky, and galaxy light effects using nothing more advanced than screen blend mode, layer masks, and a few filters.
Aaron blends jellyfish into a night sky with screen blend mode, tucks them behind the tree line with a Color Range selection turned into a layer mask, adds motion blur to match the long-exposure star trails, warps the stars behind the jellyfish with Liquify, screens in galaxy nebula images for a glowing light source, adds a tent for scale and foreground interest, then pulls it all together with a custom gradient map and a layer of grain.
CHAPTERS
00:00 Creating a simple composite in Photoshop
01:23 Adding jellyfish with a screen blend layer mask
08:05 Placing jellyfish behind the trees
10:19 Adding motion blur to match the stars
11:16 Warping stars behind jellyfish with Liquify
12:26 Adding galaxy light effects inside each jellyfish
17:07 Adding a tent for foreground scale
19:35 Bringing colors together with a gradient map
20:43 Adding grain to unify the composite
THE STEPS
1. Drag your subject onto the background and add a layer mask to hide hard edges
2. Change the blend mode to Screen so only the light areas show
3. Duplicate, flip, and warp copies to build out your composition
4. Use Select, then Color Range on the background to build a mask that tucks your subject behind foreground elements
5. Add Motion Blur to match existing motion in the background
6. Use Liquify's Bloat tool on a duplicate background layer for a warped, otherworldly look
7. Screen in extra images (galaxies, light sources) for glow and color
8. Add a foreground element for scale, clipped with a Hue/Saturation layer to adjust its color
9. Finish with a custom gradient map and a soft-light grain layer to unify everything
Get the full step by step breakdown here: phlearn.com/tutorial/simple-composite-photoshop/
Go deeper with the PHLEARN PRO course “How to Create an Epic Composite: A Dark Force (2026 Edition)”: phlearn.com/tutorial/create-an-epic-composite-a…
―
PHLEARN PRO: every PRO tutorial, one membership
◦ 200+ in-depth courses and masterclasses on Photoshop, Lightroom and photography
◦ 1,000+ downloadable PSDs, RAW images and sample files to follow along
◦ Presets, Photoshop actions and LUTs included
◦ New PRO tutorials every month, streamed in 4K with captions and chapters
◦ Rated 4.93/5 by 3,900+ students
◦ Cancel anytime, 100% money-back guarantee
▶ phlearn.com/pro
―
Follow PHLEARN:
Instagram: instagram.com/phlearn
Facebook: facebook.com/phlearn
Twitter: twitter.com/phlearn
#Photoshop #PhotoCompositing #DigitalArt
About this tutorial
PHLEARN published this 24:19 video tutorial on October 28, 2019. It has been watched 307,708 times on YouTube.
Tags
Share
This tutorial in other languages
- FRComment créer un composite simple dans Photoshop
- ESCómo crear un compuesto simple en Photoshop
- PTComo criar um Composite simples no Photoshop
- ITCome creare un semplice Composite in Photoshop
- DESo erstellen Sie eine einfache Composite-in Photoshop
- NLHoe maak je een eenvoudige Composite in Photoshop aanmaken
- RUКак создать простой композитный в Photoshop
- PLJak stworzyć prosty kompozytowego w Photoshopie
- JAPhotoshopで簡単なコンポジットを作成する方法
- ARكيفية إنشاء مركب بسيط في فوتوشوب
- HIकैसे Photoshop में एक सरल समग्र बनाने के लिए
- IDCara Membuat Komposit Sederhana di Photoshop